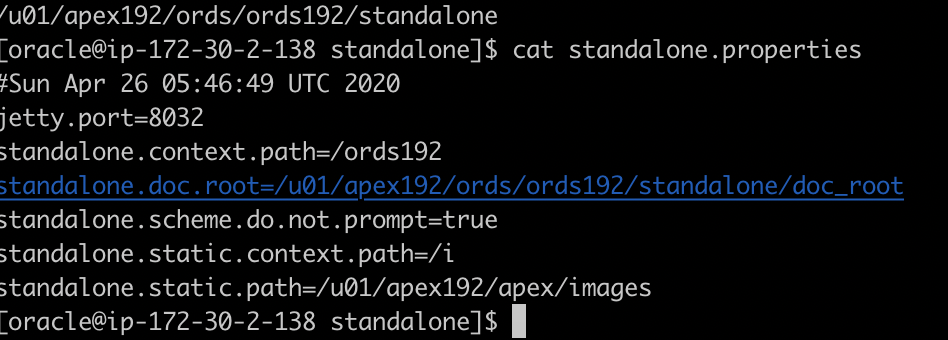
In a previous post, I blogged how I do my Oracle APEX upgrade, and part of that is to copy ORDS.
Sunday, April 26, 2020
Fix ORDS issue: No pools configured yet
Posted by
Dimitri Gielis
at
09:10
5
comments
Oracle APEX 20.1 installed with only 2 mins downtime
Over the weekend I upgraded our environment to Oracle APEX 20.1.
I describe the process of installing a new version in the Safely Upgrading to Oracle APEX 18.1 blogpost. It comes down to cloning my current PDB, calling the clone the previous version of APEX, and then upgrade the current PDB to the latest APEX version.
This time I decided to not just run @apexins, instead, I wanted to try and minimize the downtime by following the steps described in the documentation under D Maximizing Uptime During an Application Express Upgrade.
Here're my notes, in case you want to maximize uptime.
During the first two phases, the Oracle APEX apps were still running:
SQL> @apexins1.sql sysaux sysaux temp /i/
SQL> @apexins2.sql sysaux sysaux temp /i/
The first two phases took about 7 minutes.
After phase 2, I stopped ORDS, and the downtime started for people wanting to use the Oracle APEX apps.
SQL> @apexins3.sql sysaux sysaux temp /i/
It completed in less than 2 minutes!
At the same time, phase 3 was running, I copied the images folder.
Note: you can also use the CDN by running @reset_image_prefix.sql after phase 3 and specifying: https://static.oracle.com/cdn/apex/20.1.0.00.13/
I ran the following command to allow APEX apps accessing, for example, AOP or other web services:
SQL> BEGIN
DBMS_NETWORK_ACL_ADMIN.APPEND_HOST_ACE(
host => '*',
ace => xs$ace_type(privilege_list => xs$name_list('connect'),
principal_name => 'APEX_200100',
principal_type => xs_acl.ptype_db));
END;
/
And finally, I validated the ORDS config.
$ java -jar ords.war validate
I started ORDS again (running standalone), and the Oracle APEX apps were back online.
Very slick to do an upgrade with about 2 minutes downtime!
Update 27-APR-2020: Kris Rice sent me a message that there is no need to stop ORDS. It detects when APEX is upgrading and suspends traffic.
Posted by
Dimitri Gielis
at
08:33
3
comments
Monday, March 02, 2020
APEX Media Extension (AME) Publicly Available
I'm extremely proud to bring our second product to the Oracle and APEX community. With our first product, APEX Office Print (AOP), we wanted to make the Printing and Exporting of documents easy. With APEX Media Extension (AME) we want to make the processing of media easy for any Oracle database and Oracle APEX developer!
In our first release of AME, you will find the following features:
- resize images
- rotate and flip images
- crop images
- add one or more watermarks or overlays (images and text) to images
- compress images
- greyscale images
- change image formats (jpg, png, ...)
- get image information (width, height, mime type, ...)
- read media metadata (Exif, IPTC, and XMP)
You can get started by downloading the software from the APEX Media Extension (AME) website.
The zip contains a PL/SQL API, an Oracle APEX Plug-in, and an APEX sample application.
Here's a short video which shows you AME in action:
The architecture of AME is very similar to the one of AOP. There's an AME Server that accepts REST requests. On top of the REST API, we've built a user-friendly PL/SQL API.
The APEX Plug-in is a bit different, as this plug-in is an enhancement of the Dropzone plug-in by Daniel Hochleitner. We customized the plug-in so the manipulation of the images is done in the browser before the media is sent to the server.
As we love our AOP customers, we decided to put AME in our upcoming AOP release! So when you upgrade to AOP v20.1 (Gold and Enterprise on-premises licenses), you can use AME too without needing to do a separate install :)
Just like with AOP, we will have a separate AME Roadmap and of course, your voice is important to us! So let us know what you would like to see.
Here's already a quick preview of what we currently have in the pipeline:
- audio manipulation and metadata info
- video manipulation and metadata info
- online photo editor
I will do six blog posts with different use cases of AME, based on real-world examples, so you can see AME in action.
1. In our project for a flight school, we had to automatically create thumbnails and resize images.
2. An auction company wanted to allow people to upload pictures of the goods they want to sell, but every picture needs a watermark and stored on a specific location.
3. The Belgium Tennis Organization wants uniformity in images, so they store the original image and bring them to the same mime type, resolution and compression rate.
4. A photographer wanted to do analysis on his pictures; where it was taken (GPS location), if they used flash, which aperture it was set to etc. This meta data is stored with tags encoded using Exif, IPTC, and XMP.
5. Cavanti is allowing veterinarians to draw the issues a horse has directly on an image. So the final picture is overlain with different images.
6. A hotel in Belgium wanted to grayscale and rotate images
These posts will showcase the features of AME and the power it can bring to your projects. Try out APEX Media Extension (AME), we hope you enjoy it and feel free to let us know what you are searching for!
Posted by
Dimitri Gielis
at
17:43
2
comments
Sunday, February 16, 2020
Free Oracle Cloud: 19. Oracle APEX upgrades (19.1 to 19.2)
This post is part of a series of blog posts on the Best and Cheapest Oracle APEX hosting: Free Oracle Cloud.
Many people wonder how you can upgrade your Oracle APEX version to the latest version in your cloud account. The short answer is: you can't...
Oracle is doing this for you, whenever they believe it is the right time to do. The idea is that at some point you can tell Oracle when it would be a good time to upgrade your APEX environment in a specified window, but today, that is not there yet.
I read that a few days ago Oracle upgraded the APEX release to 19.2 on the free cloud.
I went in the Oracle Cloud console to start it again and up we go.
Through the Tools menu, I open APEX and logged in into my CLOUD workspace. But, to my surprise my APEX version was still 19.1.
I was doing a few things when suddenly I got "Application Express is being upgraded to a newer version":
When trying to open APEX from the console, I couldn't anymore.
I waited a couple of minutes and there it was ... APEX came back and was upgraded to 19.2:
So it looks like Oracle is checking your APEX release when you start your database and when it sees it's an older version, it will just upgrade. I thought that probably because my account was stopped, Oracle will try again in the maintenance window, but my experience learns it's not waiting on that window.
I'm glad Oracle upgraded APEX for me automatically, but it would be nice to have a log somewhere or some info that it will do this. Hopefully, this blog post will help people who only fire up their instance occasionally when doing a demo. It's best to do it a bit before so the upgrade takes place before you need your APEX instance.
Posted by
Dimitri Gielis
at
21:16
5
comments
Sunday, January 19, 2020
Print PDF from Oracle APEX to Local or Remote Printer
On Twitter, I got a lot of reactions on my previous blog post Printing to local (Zebra) printer from Oracle APEX in the Cloud.
As more people asked the question of how to print to a local printer from Oracle APEX, I will cover 3 options in this post. All options make use of some features of APEX Office Print (AOP).
When you install the AOP Sample Application, you find the examples under the following sections:
1. Call Print Window of the browser directly from a button
Create a button on the page e.g. PDF and add a Dynamic Action to it. The Dynamic Action calls some JavaScript:
This JavaScript calls following AJAX Process, which uses the AOP PL/SQL API to generate a PDF:
When the PDF is produced, the printJS JavaScript function is being called, which opens the browser's print window. The end-user can change the Printer and hit the Print button.
So this option is not a direct print to a predefined printer, but a two-step process: open print window, hit print.
2. Print directly to an IP Printer
One of APEX Office Print's unique features is that the AOP Server can send a document directly to the IP address of a printer. AOP is really smart and if it sees the printer doesn't support native PDF or the document type we send, it will convert to PDF or Postscript, which all printers support.
The only thing you have to do, in order to print directly to an IP Printer is to add some global variables of AOP. In the below example it will send a PDF to the IP Printer on the same server AOP is running but on port 3000.
3. Use of Post-Process command
You can configure the AOP Server with some post-processing commands, which allow you to run some command-line tools before and after the AOP Server is creating the output. This is a really powerful feature and one use case is to send the document directly to a local (or network or remote) printer.
Just like with the IP Printer, you define the post-process command in some global variables of AOP.
This technique I also described in the previous blog post where we printed to a local Zebra printer. The only special thing in that post was that we used ngroc to make AOP known to the Oracle Cloud.
When you have the AOP Server running on-premises, you don't have that step as your APEX app will call the on-premises AOP Server. The only thing you need to make sure is that AOP Server knows the printer you configured in the post-process command.
There you go, three options to print from your Oracle APEX app directly to a local or remote printer using APEX Office Print.
Posted by
Dimitri Gielis
at
20:22
7
comments
Tuesday, January 14, 2020
Printing to local (Zebra) printer from Oracle APEX in the Cloud
As the Always FREE Oracle Cloud is becoming more and more popular and stable, people use that service to host their APEX apps, instead of installing Oracle XE with APEX locally.
In this blog post, I will demonstrate how to print from the Oracle Cloud to a local Zebra printer by using APEX Office Print (AOP).
In my test case, I have a Zebra Printer GK420t connected to my local computer.
It's a 3 step process:
- Run APEX Office Print (AOP) on a local pc
- Make AOP available to the Oracle Cloud
- Use the AOP APEX Plug-in to do the print
1. Run APEX Office Print (AOP) on a local pc
The first thing we do is download the on-premises version of APEX Office Print (AOP) for your Operating System. Unzip the file and go to the server directory and run APEX Office Print.
./APEXOfficePrintOSX64
The first time you run AOP, AOP will create an aop_config.json file, which holds the configuration of AOP. We want to make a small modification to the file to include the local printer name.
So exit AOP again (CTRL-C) and do:
vi aop_config.json
On the last lines, you see post_process_commands, here you define your command to print to your local printer. Note that you can have as many post process commands by comma separating them.
If you want to know which printers are available on your machine, you can do:
lpstat -p | awk '{print $2}'
It will not only show you the local (connected) printers, but also the network printers. You can use any of those with AOP.
That's it! Just run AOP again and you are all set 😀
2. Make AOP available to the Oracle Cloud
Next, we need to make this local AOP server known to the Oracle Cloud. There are different ways of doing this, you could create a domain and point to the IP address of the local machine, but as the Oracle Cloud only accepts HTTPS, you would also need to set up an SSL certificate (e.g. with Letsencrypt). As this is a local machine, there's a high chance that the IP changes, so I looked for another solution which makes it easy to expose a local webserver to the internet.
This is exactly what a tool called ngrok is doing. Ngrok creates a public URL for a local webserver, in our case AOP.
Installation of ngrok, is as simple as installing AOP: download, unzip, run!
Download ngrok, unpack and run the executable:
./ngrok http 8010
It will show you the URL you can use to access your local AOP server, both HTTP and HTTPS.
In the Oracle Cloud, you always want to use the HTTPS connection.
3. Use the AOP APEX Plug-in to do the print
Import the AOP plug-in in your Oracle APEX app and specify the HTTPS URL as the AOP URL in the Component Settings of the Plug-in. Next, create a Dynamic Action and specify the Post Processing Command you want to run:
That's it! Don't think it can be any simpler than that ;)
Posted by
Dimitri Gielis
at
19:02
1 comments
Thursday, December 26, 2019
Important update of ORDS... release 19.4
In my opinion, it's a major release and most likely worth investigating to upgrade for everybody. For me, the following 3 improvements are worth the upgrade:
Performance of REST APIs
The performance of ORDS based REST APIs was significantly improved in ORDS 19.4.0 by changing how ORDS handles proxied database connections. You can read more about this in the readme.
We have a customer hitting ORDS through a mobile app really hard (potentially 130 000 end-users), so any improvements in this area are awesome for those types of customers.
Removal of PDF Generation Support
As previously advised in the ORDS 18.4.0 Release Notes, the Apache FOP based functionality to produce PDF Reports from Oracle Application Express (APEX) has been removed in this release. This means that if you still want to print or export files in Oracle APEX, you most likely want to look at using APEX Office Print (AOP). AOP is the most integrated printing and exporting solution for Oracle Application Express and the defacto standard these days. It comes with an AOP Report which is similar to what ORDS provided to APEX: based on the print attributes it generates a PDF. But, AOP gives you tons more features and flexibility when you want to print and export from APEX!
When you install the AOP Plug-in, choose your own template, for example, and look at the different Data Types that are available.
SQL Developer Web
This release sees the introduction of Oracle SQL Developer Web, an ORDS hosted web application giving Oracle Database users an interface for executing queries and scripts, creating and altering database objects, building data models, accessing Performance Hub, and viewing database activity.
After setting the following properties in default.xml:
You can access SQL Developer Web through:
http(s)://your_server:your_port/ords/sql-developer
You log in with a database user and password who is REST enabled. In this script I REST enable the user DIMI:
BEGIN
ORDS.ENABLE_SCHEMA(p_enabled => TRUE,
p_schema => 'DIMI',
p_url_mapping_type => 'BASE_PATH',
p_url_mapping_pattern => 'dimi',
p_auto_rest_auth => FALSE);
commit;
END;
/
This is what SQL Developer Web looks like, a browser-based version of SQL Developer (desktop) and a better version of what you find in SQL Workshop in APEX (although not all features are in yet, for example, I miss editing of a record):
SQL Developer Web includes another jewel... a Database Dashboard and Activity Monitoring!
When you log in with a user with the PDB_DBA role, you get a whole new section:
You find also more information in the ORDS 19.4 documentation.
Jeff Smith wrote a nice blog post about how to get started with SQL Developer Web too.
Really nice release!
Posted by
Dimitri Gielis
at
13:45
2
comments
Monday, December 23, 2019
Free Oracle Cloud: 18. Monitoring your website and APEX app
This post is part of a series of blog posts on the Best and Cheapest Oracle APEX hosting: Free Oracle Cloud.
nginx -s stop
Depending on the monitoring interval you will get an email within 5 minutes when your URL can't be reached.
Posted by
Dimitri Gielis
at
18:52
1 comments
Free Oracle Cloud: 17. Configure domain to redirect to APEX app
This post is part of a series of blog posts on the Best and Cheapest Oracle APEX hosting: Free Oracle Cloud.
In a previous blog post, we configured the webserver on our Compute VM Instance. We added a website and configured the domain dgielis.com to point to this instance.
I got many requests on how to point the domain name to a specific Oracle APEX app. This is what I will cover in this blog post.
Lets start with connecting to our VM:
From a Terminal connect to your Oracle Cloud VM:
ssh -i ssh_key opc@public_ip
The first thing we do, is changing to the root user, as we want to configure the web server. Alternatively in front of every command you can add sudo.
We logged in as the OPC user, to become the ROOT user we do:
sudo su
# open the configuration file we created in the previous blog post
vi /etc/nginx/conf.d/dgielis.com.conf
# add following
location / {
rewrite ^/$ /ords/f?p=101:LOGIN_DESKTOP:0 permanent;
}
# save and quit (:wq)
My config file looks now like this:
# to test Nginx configuration
nginx -t
# to restart Nginx
nginx -s reload
That's it.
Posted by
Dimitri Gielis
at
13:05
14
comments
Friday, December 13, 2019
The best way to be productive with APEX Office Print (AOP)
We often get the question of "how to be the most productive creating a template for APEX Office Print (AOP)".
Here are two examples of people asking in different ways:
My short answer: I recommend to use the Fast Template Switcher in our AOP Sample App or when you use the on-premises version of AOP, connect to the server and use the AOP Web Editor.
In this blog post, I will do a step-by-step guide on how I believe you will be most performant building your templates and using them in AOP.
If you didn't install APEX Office Print (AOP) yet, please read my blog post Setup APEX Office Print (AOP) to export to PDF, Excel, Word, Powerpoint, HTML and Text
Now, we will add AOP to a button on a page in an APEX app.
Dynamic Action Plug-in
When you have a button on the page, right-click on it and choose "Create Dynamic Action".
Give it a name and as Action, specify APEX Office Print (AOP) - DA [Plug-in]
Data
The most important part of any report is the data it contains. So, the first step is to define where AOP can find all the data you want to use in the report. AOP gives you the ability to get all your data through a hierarchical SQL statement by using the cursor() or JSON syntax. For example, if we want to query all the orders and order lines (details) of a given customer we can specify in the Data Source:
select
'file1' as "filename",
cursor(
select
c.cust_first_name as "cust_first_name",
c.cust_last_name as "cust_last_name",
c.cust_city as "cust_city",
cursor(
select
o.order_total as "order_total",
'Order ' || rownum as "order_name",
cursor(
select
p.product_name as "product_name",
i.quantity as "quantity",
i.unit_price as "unit_price",
APEX_WEB_SERVICE.BLOB2CLOBBASE64(p.product_image) as "image",
40 as "image_max_width"
from demo_order_items i, demo_product_info p
where o.order_id = i.order_id
and i.product_id = p.product_id
) "product"
from demo_orders o
where c.customer_id = o.customer_id
) "orders"
from demo_customers c
where customer_id = :P1_CUSTOMER_ID
) as "data"
from dual
In case your data is more complex than you can define in a hierarchical SQL statement, you can also specify a PL/SQL Function or a JSON data source.
AOP Template
Now you want this data in a specific look and feel. AOP allows you to specify your own template written in Word, Excel, Powerpoint, HTML, and Text. A good way to start your template is by using the AOP Template (which is selected by default). This means you don't specify your own template yet, but let AOP generate a starting template for you, based on the data you provided. AOP can generate a starter template in Word, Excel, and HTML.
Based on your data, it will generate a {tag} for every column you have. When AOP sees there are multiple records (a table), it will generate a loop statement {#tag}{/tag} as well.
Now you can iterate over your template to make it exactly as you want it to look like. Just rearrange the {tags} to the specific positions where you want your data to be. Apart from that, you are in Word (or Excel, Powerpoint, ...) and have access to all of the native Word features to create a gorgeous look and feel. If you already have a document, you can also copy and paste the tags from the AOP Template into your existing document.
What I see, is that people adjust the template, upload the template, adjust, upload, adjust, upload over and over. There's actually a much faster way to iterate through template development.
Local Debug
Behind the scenes, the AOP Plug-in generates a JSON file that is being sent to the AOP Server.
To get this JSON, you can go into Shared Components > Component Settings > APEX Office Print and set Debug to Local. This will enable AOP Debug for the entire application. If you just want to put AOP Debug on for the current button, add the following to the Init PL/SQL Code of the AOP Dynamic Action:
This is what you should see in the Dynamic Action:
When you click the button, you will get the JSON file.
Quickly changing Templates
With AOP we ship an AOP Sample App. This is an APEX application which showcases many features of APEX Office Print:
In the Debugging section, you find a Quick Template Changer link:
The Quick Template Changer allows you to quickly try new templates based on an AOP JSON file.
You drag the JSON file in the first box under Exported JSON.
The JSON will be parsed and the content of the JSON is shown in the JSON Data field.
Next, you drag your template in the Template section and finally, you select the Output you want and hit the Process button.
You can now remove the template and drag-and-drop a new version of the template and hit the Process button again. This way you can quickly see the result while making changes to the template.
Web Editor in AOP On-Premises version
If you download the AOP On-Premises version and run the AOP Server (which is one executable) locally, or you navigate to the server URL where your AOP Server is running, you will see the AOP Web Editor.
This editor is really powerful and has more features than the Quick Template Changer you find in the AOP Sample App. Just as before you drag-and-drop the JSON file in the Exported JSON section.
The AOP Web Editor will parse the JSON and will show a link to the template to Download (unnamed.docx). If you want to change the Template, you just drag-and-drop another template in the Template section. On this screen, you can even prepend and append files and add sub-templates. If you don't like to always select a file from the file system, you can select all files or even a directory and drag-and-drop it entirely in the File cache section, so you can swap files even quicker!
Select the Output and hit the Process button, and presto, you see the output with the (new) template!
But that is not all, you can also change the Data on the fly by going into the Data tab:
Or see the new resulting JSON file after changing the data and template:
In case you want some examples, hit the Load Sample button and select a sample.
I really believe the AOP Web Editor will help you a lot in your development of AOP Reports.
This AOP Web Editor app is actually a nice showcase that AOP can be used with any technology. The Web Editor is written with React.js.
Hope this helps you to be even more productive with AOP!
Posted by
Dimitri Gielis
at
21:02
0
comments