This post is part of the series My spin on the new Oracle APEX Application Development Service.
In this post, we will set up everything you need to build an Oracle APEX application that is able to also send emails.
I expect you already have an Oracle Cloud account. If not, it's easy to sign up for one by following the wizards. This post starts when you enter the Oracle Cloud Getting Started page.
Click the menu icon on the top left, select
APEX Application Development, and click on
APEX Instances:
Click the
Create APEX Service button and fill out the details.
The database name can only be 14 characters and at the moment you can only choose a 19c database.
Behind the APEX Service is an Autonomous Oracle Database, optimized for APEX.
I love this APEX Service (and in general the Autonomous Oracle Database) because it can auto-scale. We select 1 OCPU and 1TB of storage, but with Autoscaling it can go up to 3 OCPUs depending on the load. This is a major feature as in almost all the projects I'm involved in, you need, from time to time, just a little extra power (e.g. end-of-month calculations or heavy traffic to your app after an event). In my World Cup Football betting app, for example, every time a game was finished I had a huge spike in visitors as people wanted to know their scores and rank. And the cool thing is that it doesn't require downtime and happens automatically! Note that when it effectively auto-scales you pay for the extra OCPU and potential extra storage, but only for the time it auto-scaled.
Furthermore, define the password for the ADMIN user, which is needed to login to SQL Developer Web and Oracle APEX. And finally, define the network access. As I want the Oracle APEX apps accessible from anywhere in the world, I chose "Allow secure access from everywhere". Note that you can always change the access and define access control rules later.
Hit the
Create APEX Service and the magic will start!
A few minutes later the
APEX Instance is ready to be used. Behind the scenes, there's an Oracle Database, APEX (20.2 at the time of writing), and ORDS (20.3 at the time of writing) fully configured.
We can now access APEX by clicking on the "Launch APEX" button and create REST services and get into the Oracle database by clicking the "Launch SQL Developer Web" button.
But before we build an Oracle APEX app, we need to do one extra thing: configure the Oracle Cloud and APEX to allow to send emails. It's a two-step process: create SMTP credentials and enter the email addresses from which emails are allowed to be sent.
To get the SMTP credentials, go to Identity > Users and click on a user
In the details of the user, click the link
SMTP Credentials
Click the
Generate SMTP Credentials:
Enter a description and click the Generate SMTP Credentials button:
A
username and password are created. Make sure to
copy both:
Next, we will add the email addresses from which emails can be sent.
Go to Email Delivery and click on Email Approved Senders and hit the Create Approved Sender button.
Enter the Email Address and hit the Create Approved Sender button.
Repeat the same for other email addresses you want to send from.
With United Codes we own both domains: united-codes.com and unitedcodes.com, so I enabled both my email addresses.
Click the
Email Configuration and copy the
Public Endpoint (smtp.email....):
Finally, we will configure the Oracle APEX instance with the SMTP credentials.
Head back to the APEX Instance Details
Click the Launch SQL Developer Web button and login with ADMIN and the password which was defined during the creation of the service
The first time you open
SQL Developer Web, there's a nice guided tour that explains the functionality in SQL Developer Web. (
Note: in case you are interested in a Guided Tour for your own Oracle APEX app, have a look at Plug-ins Pro, we've built a Guided Tour APEX Plug-in which makes it very easy to provide your users with a nice interactive guide.)
Finally, we arrive at a SQL Worksheet, in which you can type any SQL or PL/SQL statement:
By using the APEX_INSTANCE_ADMIN package we can define the SMTP configuration:
set define off
BEGIN
APEX_INSTANCE_ADMIN.SET_PARAMETER('SMTP_HOST_ADDRESS', 'smtp...');
APEX_INSTANCE_ADMIN.SET_PARAMETER('SMTP_USERNAME', 'o...');
APEX_INSTANCE_ADMIN.SET_PARAMETER('SMTP_PASSWORD', 'k...');
COMMIT;
END;
/
Click the green arrow with the paper, which runs the commands as a script:
That's it, now we are ready to send emails from our APEX instance.
Before we login into APEX, I looked a bit more around in SQL Developer Web. For example, I saw that the previous versions of Oracle APEX are still there:
Trying to delete the older versions or some objects gave me insufficient privileges. This is good, as it means you can't accidentally do something bad:
There are also some rules to follow, for example when I wanted to create a new Oracle database user, it has to fulfill some rules. It took me a bit to figure out which ones:
Anyway, I really like SQL Developer Web. It has many great features and gives you access to your database by just using a browser.
So now, let's get started with APEX. From the APEX Instance Details click the Launch APEX button.
The first time we try to login into APEX, we need to provide the password we defined during the creation of the service. Hit Sign in to Administration:
We get a nice welcome message and it asks us to create a new
Workspace. Hit the
Create Workspace button:
Define a new database user, a password, and a workspace name and hit the
Create Workspace button:
A few seconds later the workspace is created and we can log in to that Workspace to create our first Oracle APEX application.
Click the workspace name link:
Enter the workspace name, the username (which is the database user), and the password and hit the
Sign In button:
And here we are in Oracle APEX. Now we are ready to build APEX applications.
To test if the sending of emails work, head over to SQL Workshop > SQL Commands and enter the following code:
begin
apex_mail.send(
p_to => 'xxx',
p_from => 'xxx',
p_body => 'Testing email from Oracle APEX Cloud service',
p_subj => 'APEX_MAIL Package - Plain Text message');
apex_mail.push_queue;
end;
It should run fine:
Check APEX_MAIL_LOG to see if the email was effectively sent:
In case you don't see an entry, it probably means the email is hanging in the mail queue. Check the APEX_MAIL_QUEUE for possible errors:
The errors that I've come across are the following:
- ORA-29278: SMTP transient error: 421 Service not available
- ORA-29279: SMTP permanent error: 535 Authorization failed: Envelope From address <...> not authorized
The first error most likely means the SMTP credentials are not entered correctly (see SMTP credentials).
The second error most likely means that the email from the address is not allowed to send emails (see Email Delivery).
Before I finish this blog post I want to highlight that from the APEX Service, you can also see the details of the Autonomous Oracle Database that was created behind the scenes.
When you are in the APEX Instance Details, click on the link of the Database Name.
We will now get the details of the Autonomous Database
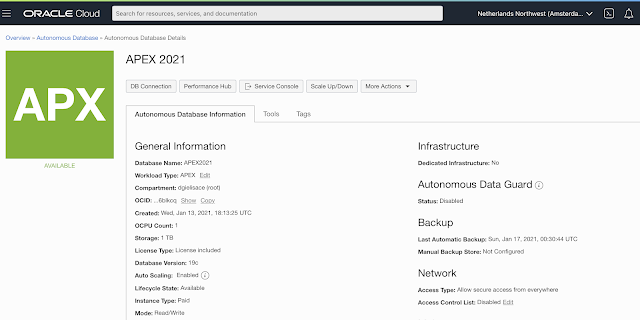
In case you want to stop the APEX instance or terminate it, you have to go to the database to do this. See the
More Actions button. Also when you want to
manually Scale Up or Down, you do it from this database screen and not the APEX instance screen. As some might search for it, I thought to point it out in this post. In my series where we set up an
Always Free Oracle Cloud, we get a free Oracle Autonomous Database with APEX and SQL Developer Web too, so you might wonder, what is the difference with setting up an APEX instance? The components look identical, but I did notice one difference, the workload type is now called APEX instead of, for example, Transaction Processing:
But regardless of the workload type, you will see all the Autonomous Databases also in the APEX Instances screen:
When clicking on an APEX instance name, you see metrics of the APEX instance:
Now, you could also set up the APEX instance through the Autonomous Database wizard and select the APEX workload type:
The difference is that when you follow the APEX Application Development, settings are pre-set or hidden, so it's a more seamless experience. But I hope that in the future when you select to use this new wizard, the wizard will also guide you to set up the email delivery and SMTP credentials automatically, so all those steps are done for you. Object Storage would be another good candidate to set up automatically, for example, create a bucket with the same name as the APEX instance. This would also differentiate it more from using the Create Autonomous Database wizard.
That's it for now... next up, I will import an existing database (schema) and Oracle APEX app into the environment we just created.


5 comments:
Thanks Dimitri! Really helpful blogs. Looking forward to see your next blog. We want to use these instances in production. However, curious to see how the production rollout can be done seamlessly with SQL developer web. We are doing it with SQL developer desktop now with the downloaded wallet. This is not part of the new $360 USD APEX package.
Hello Dimitri,
as you write in your post "...and at the moment you can only choose a 19c database.
Behind the APEX Service is an Autonomous Oracle Database, optimized for APEX." and I followed your old posts about the free Oracle DB in 2019, I'm a happy always free user.
Unfortunately I also see only version 19c installed in my always free setup. Do you know if there will be an automated update from Oracle to version 21c?
Thanks,
Carsten
Thanks Dimitri,
how did you solve the "ORA-29279: SMTP permanent error: 535 Authorization failed: Envelope From address <...> not authorized"?
I checked my entry within "Email Approved Senders" many times...
Thanks in advance
Steffen
Hi Dimitri,
This was so helpful today. Thank you so much for taking the time to write about this.
All the best,
Rachel B
Hi Dimitri,
I followed all the steps.
I put a dummy email address into the aproved sender, instead of yahoo or gmail.
When I run the statement, I have no result in the output area.
I tried to send an email, but in the APEX_MAIL_QUEUE, shows no error and the MAIL_SEND_COUNT is also 0?
What should I do?
Thanks!
Post a Comment