Monday, September 14, 2020

Add awesome checkboxes and status fields in an Interactive Grid in Oracle APEX

This post is part of the Getting Started with Plug-ins Pro APEX plug-ins.

I don't know about you, but I had a love/hate relationship with Interactive Grids in Oracle APEX.

I love it because it's really powerful and very useful and fast to insert, update, and delete multiple records at once. It was also the basis of many new things in APEX linked to modern web development.

But I also disliked it a bit, because to me it felt different than any other component in APEX. Especially in the beginning IGs just didn't work for me. Whenever I wanted to do something, I found myself writing multiple lines of JavaScript. Things have changed, IG is much more stable, and more built-in features have been introduced, and extending it has become easier, or I now have a better understanding of how things work. Today, in every project I do, Interactive Grids are part of it...

Interactive Grids follow the Model View Controller (MVC) model, which is typically used in JavaScript projects. Here's a diagram which shows the (complex) architecture of this component:


John Snyders, one of the architects behind IG, wrote a nice blog post in 2016 which explains Interactive Grids. When you look at John's blog, you will find many more posts about Interactive Grids. He also has an excellent IG cookbook app that shows different use cases of Interactive Grids.

In this blog post, I want to focus on how to represent a status field, I typically call it a flag field. The most common values of such a field are 'Yes' and 'No', 'On' and 'Off', 'Active' and 'Inactive', 'True' and 'False'.

Your native choices in Oracle APEX at the moment of writing are:
  • a checkbox
  • a radio group
  • a switch (which depending the component settings can look like a Switch, Pill Button or Select List)
And here's an animated gif showing how these options look. Changing the first row values from Yes to No and the second row from No from Yes.


The native implementation in APEX is that you have to click in the cell to make it editable, then you see the checkbox, and once selected it shows the display value. When I show those options to my customers, many of them tell me: "Can I not just have a checkbox?" They mean they always want to see the checkbox visible and selected or unselected, like you have with the Row Selector (first column in the IG). 

Although Interactive Grids have evolved over the last 4 years, in case you want such a checkbox, it's not as easy as it should be and you need to write custom JavaScript. When the question was asked on Twitter why it wasn't there yet, you see John's reply:


I told Bartosz, who is our lead developer at Plug-ins Pro, that I would love to have an Interactive Grid Checkbox Pro plug-in, to make it very easy to add a "simple checkbox"... but it turned out John was absolutely right... this is not an easy plug-in to do! After multiple iterations, Bartosz finally cracked it and he came back with a checkbox on steroids! 😉

When I think about a checkbox, I don't think about two values, but three:
  • null (untouched)
  • unchecked (not selected)
  • checked (selected)
So, we wanted to give people the choice of what they like: a checkbox with two values or three.
When we discussed the look of a checkbox it turns out that people like the HTML5 checkbox, which personally looks more 'old school' to me, but of course it's very known. But we wanted to give people more choice, so they have full freedom on the look-and-feel of the different states. In some applications it's more intuitive to have a switch look or a check icon or a smiley to name a few.

Here's a quick example of our plug-in in action 😀


Let's move on integrating this awesome checkbox into our Interactive Grid. 

The first step is to download and install the plug-in. I covered that in my blog posts Plug-ins Pro: Getting started: Sign-up and install your first Oracle APEX Plug-in. So if you didn't import the Checkbox Pro plug-in yet, read that post first.

Once it's installed it's pretty simple to use the plug-in. Go to a column of the Interactive Grid and change the Type of the column to the United Codes IG Checkbox [Plug-in].


You can customize the look and feel of the plug-in in the Settings area. The Type can be the HTML5 implementation or a checked and not checked icon. So if you want thumbs-up and thumbs-down, or you want a square and checkbox, you name it, you are free to define the icon of your choice.
Next, you define the value it should have when checked and not checked and whether you want to see an empty column or the not checked value when you add a new row.
Finally, you can define if you want to see a title on hover and if people should be able to click the checkbox in the read mode of the IG or only when Edit mode is on (which is default IG behaviour). 
The last bit is really what makes this checkbox such a nice user experience. People don't have to be in the cell first to change the checkbox or icon! You don't hear or see my body language when I tell you that sentence, but I'm super excited (!) about this feature!  The edit and read mode of the IG, made this plug-in so hard to make.

Events

What is really cool about this plug-in, it's not just a visual checkbox, but it also behaves like a native item and column in APEX. So if you want to dynamically set the value of the checkbox, the plug-in understands that. In the below example, when we change the First name to DIMI, it will set the value of the IS_ACTIVE4 checkbox column.


Also when you want to detect a change of the state of the checkbox, you can hook up a dynamic action to that. In the below example, we have a change event on the checkbox on column IS_ACTIVE1 and IS_ACTIVE4. Whenever we change that column (meaning when we check/uncheck the checkbox) the salary will change.
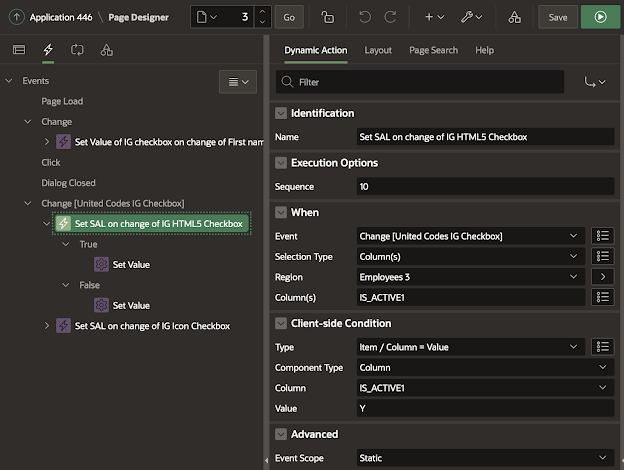

And this is what it looks like:


And there is more...

The checkbox is accessible, supports validations, and you can style it however you want.

And just like any other Plug-ins Pro plug-in, there's extensive documentation and a great sample app that showcases the different features.

You can try the plug-in yourself for 1 month for free in your own APEX applications, so you can see what it can do for you. I also want to highlight that through the end of September 2020, there's a special running. You can find all the details on the Plug-ins Pro website!

I use this plug-in in every Oracle APEX project and I strongly believe anybody using Interactive Grids will benefit from this plug-in! This plug-in works from Oracle APEX 19.2 and above.

Note: depending on when you read this article, the plans are that from Oracle APEX 20.2 a more advanced checkbox item is native available, but it's unclear if it has all of the features our checkbox plug-in has. I will update this post once APEX 20.2 comes out. 

Monday, September 07, 2020

Building a better Form in Oracle APEX: Instant validation and feedback on items

This post is part of the Getting Started with Plug-ins Pro APEX plug-ins.

Creating a form with some items in Oracle APEX is fast and easy... Here's an example of a sign-up form I created in my APEX app, heavily inspired on the Github sign-up form. 

I added a region, a couple of items, and a button to a page. Here's how it looks behind the scenes:

In order for us to get good data we will need to specify some validations, so end-users can't type just anything. If we don't then, for example, when entering a username that already exists they'll get a unique key violation error.

Here are the validations we will specify:

  • username doesn't exist yet
  • valid email
  • password must comply with our complexity rules
  • username, email, and password are required
  • when registering as a company the company name must be entered
  • only allow valid VAT number when entered
And this is how these validations look on our APEX page. You will see we use different types of validations: PL/SQL, no rows returned, regular expressions, etc.:


When we do nothing else on our APEX page and leave the form as is, it will cause frustrations for many end-users, because:

  • When a typo is made in the email field, they will only be notified after they hit the sign up button
  • When the password doesn't comply, again, only after hitting the button they are notified
  • When the username is already taken, only after hitting the sign up button they find out about it

As a developer, I strive to make my forms as user-friendly as possible in the time I have. We are responsible for the apps we put out there and we love our customers, so the last thing we want is to cause any type of frustration.

So if we want to improve our Oracle APEX page, what does it take? 

We want to have our validations be user friendly, context-aware, and responsive, meaning the end-user should see the issues live, relevant for what they are doing at that moment.

And here's the problem for the developer... it takes a lot of effort and different skillsets: native APEX skills, PL/SQL skills, JavaScript. This is what we already have:

  • There's a PL/SQL process, which handles the sign-up and spits back errors in case things go wrong
  • We already created APEX validations that are run before the sign-up process
  • We already have some items where the value required field set to Yes 
  • For the email item, we also specified the correct type of item
All those validations are being fired when you hit the Sign Up button. In the case of a value being required and email type specified on an email item, the check is done before the page is submitted, but for all the validations we specified in the processing section, those only get fired when the page is submitted. 

When we want to give the end-user immediate feedback while they are entering something in an item that is not correct, this requires manual coding. You end-up writing many dynamic actions and potentially some custom JavaScript and AJAX calls.

Some developers might think to only include the dynamic action validations, but that is even worse. You have to have the APEX (server-side) validations, as you can't rely on JavaScript being fired. So you end up duplicating the logic in the validation portion of the processing section and your own dynamic action code. Whenever something changes, you have to change twice... 

It's an understatement when I say I don't like to write code to tackle the same thing twice!

So instead of all this manual development, what is the solution? Use the Plug-ins Pro Client-side Validation Plug-in! I will show you exactly how to do that now 😃

The first step is to download and install the plug-in. I covered that in my blog posts Plug-ins Pro: Getting started: Sign-up and install your first Oracle APEX Plug-in. So if you didn't import the Client-side Validation plug-in yet, read that post first.

Next, create a Dynamic Action on the page which will fire on change or on key release for the items we want to check. Now, you can specify all items, or even cooler (!) you can specify the region, and all items in that region will be validated! So whenever the user enters something in the fields of that region, the dynamic action will fire.


And as Action, we specify the Client-side Validation Pro [Plug-In] and for Affected Elements, we leave it blank. The plug-in is super smart and will show the notification for the item you are on, but if you specify the items that are affected, it will validate all of those items.


That's it!! When you run the page, the end-user gets instant feedback!


The above implementation of the plug-in barely scratches the surface. I always specified in the validation to show the notification inline with the item, but the plug-in also supports showing a notification on top of the page or both. This plug-in is a real powerhouse! 

It even supports validations for Interactive Grids! If you are interested in live IG validations, check out the Sample App (under Triggering Elements) that ships with the plug-in. Normally it would require a lot of (hardcoded) JavaScript, but not when using the plug-in. One client-side validation and native APEX validations do the job! Here's a quick screen recording with an example:


I can't stop telling how amazing this plug-in is! It's *really* smart. APEX has many validations built-in (HTML5 and Server-side validations) but this plug-in will combine them all together with client-side validations in a seamless user experience. If the plug-in can do the validation without a round-trip to the database, it will. There's no duplication of code, it's super easy to implement and very maintainable and it will save you hours or even days of development. 

This blog post would become really long if I would go over all the features of the plug-in, but I do want to highlight one other implementation that takes so much manual code without this plug-in.

What if we wanted to give a soft warning? So when the validation fails, the user can still say to move on. Here's an example: I have a form where you can enter 3 numbers. Number 1 and Number 2 and the sum of both. On submit it will validate the result and do some processing.


So when I enter 1 + 2 = 3, the page should submit fine. But when I enter 1 + 2 = 4, I should get a question if I want to continue or not. If I say no, it should stay on the page. When I say yes, it should submit nevertheless. Here's a quick gif to explain what I mean:


So let's look at what we did behind the scenes to do this.

We have a region, with 3 items and a button. The button is defined by a dynamic action. The Dynamic Action is called Client-side Validation and it fires on click of the Submit button.
As a true action we specified the Client-side Validation Pro [Plug-in] with the following settings:


Note that we defined a success callback and failure callback and this is what makes our validation conditional! This is something that is not possible with Oracle APEX out-of-the-box. When the validation is successful we submit the page. But when it fails, we ask for confirmation if the end-user wants to continue even with an invalid result. If yes, we will give a hidden item on the page the value 'Y'.

Our Validation is a normal APEX validation defined in the processing section of our page:


Pretty powerful, right? 😉

I mentioned in a previous blog post we don't take things lightly. We spend a huge amount of time on the development to make the plug-in act as a real component, so it knows about universal theme and translations to name a few. We try to make it as easy as possible for you to use, along with writing detailed documentation and creating a sample application that shows the different features of the plug-in. This all together took over 400 hours to do for this plug-in, but every time I use the plug-in myself, I'm happy we did. I'm super excited that I can just use it without me needing to write all this code and maintain it and there is great documentation and a sample app to get me going fast.  

There's nothing that comes even close to what this plug-in can do. If you read the documentation of this plug-in and look at the sample app, you will understand 😉

You can try the plug-in yourself for 1 month for free in your own APEX applications, so you can see what it can do for you. I also want to highlight that through the end of September 2020, there's a special running. You can find all the details on the Plug-ins Pro website!

It may not be the sexiest plug-in, but heck, it works!

Friday, September 04, 2020

Plug-ins Pro: Getting started: Sign-up and install your first Oracle APEX Plug-in

In a previous post, I gave a bit more background on Plug-ins Pro. In this post, I will guide you on how to get started on your FREE trial. I plan to blog more about the specific plug-ins and will update this post with the links to the specific plug-in posts.

Let's get started!

Surf to plug-ins-pro.com and click the sign up button.

Note: If you already have an account on any of the other United Codes products, for example, APEX Office Print, you don't need to sign up anymore, you can just login with the same credentials.

Enter your email and hit the Sign Up button:
You get a confirmation an email is on the way:
A few seconds later you will receive the email which contains the link to confirm your email address:


During the confirmation, it will ask you to set a password:
Hit the Set Password button and there you go, you are in the Plug-ins Pro portal.

The first page you come to will explain how to get started.  Click the orange link "sign up for a FREE trial":


It will bring you to the Available Plug-ins section on the portal. Here you see an overview of all available plug-ins and a little bit of information. The icons also show which type of Oracle APEX plug-in it is.


Click on the plug-in that you are interested in. You will see some more info and some buttons that link to the documentation, sample app and there's also the FREE Trial button.


Once you click the button, the plug-in is added to your account, and a Download link becomes available:


Unpack the zip file:


Inside, there's a README.md file which gives you more info. But let's continue to import this plug-in into our own Oracle APEX application.

Go to your APEX app > Shared Components and click the Plug-ins link:


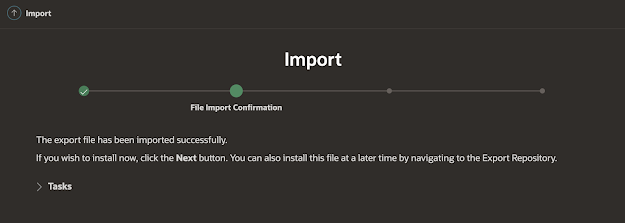
Click Import and select or drag and drop the file which has the plugin word in it to the section on the import page: e.g. I dragged file item_type_plugin_unitedcodes_ig_checkbox.sql


Follow the rest of the wizard:


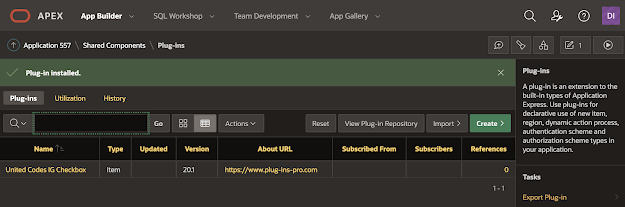
And there we go; the plug-in is imported in our own application:


In order to use the plug-in we also have to run a script which will create some database objects the plug-in uses.

Go to SQL Workshop > SQL Scripts 


Click the Upload button


and Upload the file with the "ddl" in the filename:


Once uploaded, click the Run button next to the script:


And hit the Run Now button:


You should see that all is successful:


Next, go to SQL Commands:


And copy the following from the README.md file:


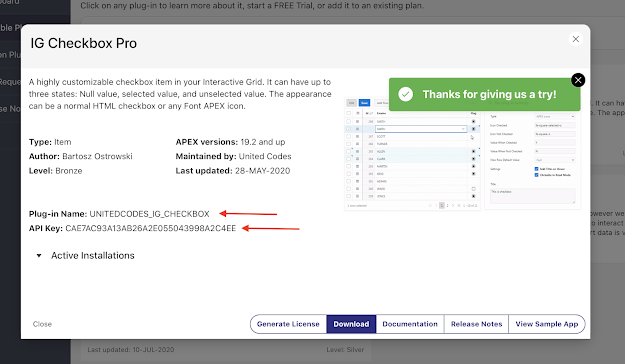
And enter the plug-in name and your API key which you can find in the Plug-ins Pro dashboard  by clicking on the plug-in to bring up the details:


Once replaced, hit the Run button and it should say the license is created:


That's it... now you are ready to use the plug-in.

** optional **

In case you try to install the plug-in in an environment  that doesn't have internet access you can license the plug-in manually.

In the README.md there's another option. Run the below in SQL Commands (replacing the plug-in name and API key as we did before):

      begin
        uc_pluginspro.manual_license(
          p_plugin      => 'PLUGIN_NAME',
          p_api_key     => 'YOUR_API_KEY');
      end;  
      /

This will give you a Key, copy the key:


Go to the Plug-ins Pro Portal and click the Generate License button:


Paste the key you copied earlier here:


Click the Generate License button and there you get your license key:


Do the second part of the README.md and copy your license key in the code:

      begin
        uc_pluginspro.manual_license(
          p_plugin      => 'PLUGIN_NAME',
          p_api_key     => 'YOUR_API_KEY',
          p_license_key => 'YOUR_LICENSE_KEY');
      end;  
      /

Run the code and now you have manually licensed the plug-in:


**

In another post I will go into more detail on how to use the different plug-ins and in which scenarios they are useful. But before I finish off this post, I recommend that you import the Sample Application that comes with the plug-in. In the sample application, you will see many examples on how to best use the plug-in. Although probably not many people read documentation, we have it, and it's very extensive, so if you want to know the nitty-gritty details, it's a great resource.

And finally, if things are not going as planned and you need help, or you have questions or remarks, don't hesitate to contact the Plug-ins Pro support team at support@plug-ins-pro.com

This post was how to install the plug-in in your APEX app, in the next posts I will show you the different plug-ins. Here's a quick reference index which I will update on every blog post:
Coming up soon:
  • An exciting new plug-in which we will announce :)
  • More info on Plug-ins as a service, pricing, and the special offer

Wednesday, September 02, 2020

Need to extend Oracle APEX? Welcome Plug-ins Pro!

After APEX Office Print (AOP), APEX Media Extension (AME), and APEX Project Eye (APE), we launched our newest product and service, Plug-ins Pro, in June.


Since 2004 I've used Oracle Application Express (APEX) and I just love it. With every new release of APEX things become easier and new features get added going from new item types like switches to rich components like charts. But the web is moving fast, and customers want more and more which means you need to go outside of what APEX provides. The main building blocks of APEX are the Oracle database, SQL, PL/SQL, HTML, CSS, and JavaScript. You can use any of those technologies to extend Oracle APEX with custom components. This is a real benefit of APEX, you can go from Low Code to High Code in no time. Really, there's no limit... only your imagination and skills.

Over time I've created many extensions for APEX, going from building reusable PL/SQL packages to integrating some JavaScript library. The issue with building those one-off customizations is that you have to maintain them. Where plain Oracle APEX applications stand the test of time very well, for example, an app built in 2006 still runs today, even after upgrading to the latest Oracle APEX version. Whenever I used custom code, especially JavaScript, it was less obvious to keep that current, and it would be one of the first things that break. Next to that, you make the code work specifically for a project, and in the next project you need something similar, so you copy the solution and make changes specific for that project. It's always in the context of a project that things are built, never looking at the bigger picture.

As the Oracle APEX team identified the need to extend APEX and wanted to provide a way that makes it more reusable and easier to maintain between APEX applications, they introduced plug-ins in APEX 4.0, this is now 10 years ago!

The result was that the awesome APEX community started to create and share plug-ins. Most people offer those plug-ins as open-source. Initially, there was an APEX plug-ins website maintained by Itium that had a catalog of all APEX plug-ins, but today you find the plug-ins catalog on apex.world.


There are many great plug-ins from people like Bartosz Ostrowski, Daniel Hochleitner, and Ronny Weiß to name a few, but there are also many plug-ins now that are built for a specific purpose but not maintained any longer. If you included one of those plug-ins in your app, you are on your own. But even if it's still maintained, you can't expect the author to add new features to the plug-in when you need them or when you upgrade the APEX version and it breaks. 

Creating plug-ins and maintaining plug-ins takes a lot of time, especially when you want to think about the bigger picture and make them so good that they can be used in many different projects, they are fully documented and you have some sample code, so it's easy to include in any project, even when it's been a while since you last looked at it.

And this is how Plug-ins Pro was born... we want to take away the pain of having to build and maintain APEX plug-ins. These are not just plug-ins, those are rock-solid, state-of-the-art, professionally built plug-ins that behave just like native Oracle APEX components. They are accessible, translatable, universal theme ready, and most importantly fully documented, with many samples on how to use them AND supported! If you have an issue or you want an extension, you know who to go to.

With AOP we made printing and exporting of data easy in the Oracle database and APEX. With Plug-ins Pro we want to make extending the Oracle database and APEX easy!


Once I knew we wanted to bring high-quality, supported plug-ins to the APEX community, I knew we would need the best people to bring them to life.  Bartosz Ostrowski joined the team in January of this year and began creating our awesome plug-ins.  When we launched Plug-ins Pro we started with 3 highly demanded extensions for Oracle APEX:
And we didn't go light on those plug-ins... the client-side validation plugin for example took over 400h to build!

We started from a requirements document:


We built the plug-in, tested it in on the different APEX versions (starting with 18.1), and finished off by creating extensive documentation and a full-fledged sample application! 


The goal of Plug-ins Pro is to make you successful, so you can turn your ideas into reality with Oracle APEX and the Database.

Our goal is not to have all the possible plug-ins, instead, we want to create plug-ins that make a difference, and that would take a lot of time to build yourself. We have some plug-ins in the pipeline, some I'm super excited about and can't wait to share with you :) but just like with APEX Office Print (AOP), we especially want to listen to you, what are you searching for, and what would make a difference for you.

This is why on our website, you can submit ideas for new plug-ins and vote on already submitted ideas!


I will write some more blog posts on the plug-ins we offer, but if you already want to try them, head over to the Plug-ins Pro website and try them 1 month for free!


Last but not least... through September 30th, 2020, we are running an Early Adopter Special Offer. Show your support for Plug-ins Pro and help us get off the ground running!  Get all the details at plug-ins-pro.com.