In a previous post, I gave a bit more background on Plug-ins Pro. In this post, I will guide you on how to get started on your FREE trial. I plan to blog more about the specific plug-ins and will update this post with the links to the specific plug-in posts.
Let's get started!
Surf to plug-ins-pro.com and click the sign up button.
Note: If you already have an account on any of the other United Codes products, for example, APEX Office Print, you don't need to sign up anymore, you can just login with the same credentials.


Hit the Set Password button and there you go, you are in the Plug-ins Pro portal.
The first page you come to will explain how to get started. Click the orange link "sign up for a FREE trial":


Click on the plug-in that you are interested in. You will see some more info and some buttons that link to the documentation, sample app and there's also the FREE Trial button.


Unpack the zip file:

Inside, there's a README.md file which gives you more info. But let's continue to import this plug-in into our own Oracle APEX application.
Go to your APEX app > Shared Components and click the Plug-ins link:


Follow the rest of the wizard:
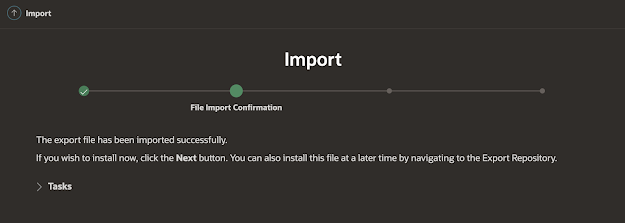

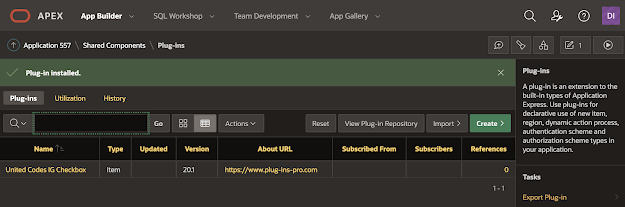
And there we go; the plug-in is imported in our own application:
In order to use the plug-in we also have to run a script which will create some database objects the plug-in uses.
Go to SQL Workshop > SQL Scripts


and Upload the file with the "ddl" in the filename:


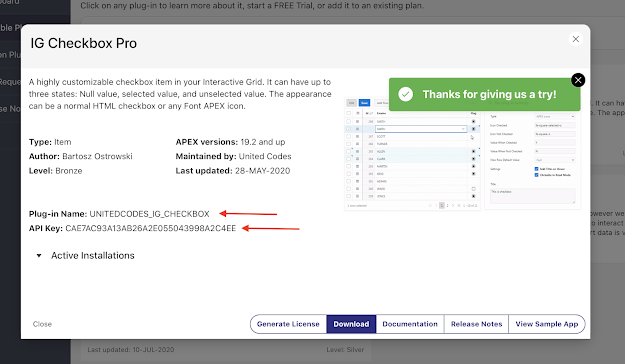
And enter the plug-in name and your API key which you can find in the Plug-ins Pro dashboard by clicking on the plug-in to bring up the details:
Once replaced, hit the Run button and it should say the license is created:

That's it... now you are ready to use the plug-in.
** optional **
In case you try to install the plug-in in an environment that doesn't have internet access you can license the plug-in manually.
In the README.md there's another option. Run the below in SQL Commands (replacing the plug-in name and API key as we did before):
begin
uc_pluginspro.manual_license(
p_plugin => 'PLUGIN_NAME',
p_api_key => 'YOUR_API_KEY');
end;
/
This will give you a Key, copy the key:

Go to the Plug-ins Pro Portal and click the Generate License button:

Paste the key you copied earlier here:

Click the Generate License button and there you get your license key:

Do the second part of the README.md and copy your license key in the code:
begin
uc_pluginspro.manual_license(
p_plugin => 'PLUGIN_NAME',
p_api_key => 'YOUR_API_KEY',
p_license_key => 'YOUR_LICENSE_KEY');
end;
/
Run the code and now you have manually licensed the plug-in:

**
In another post I will go into more detail on how to use the different plug-ins and in which scenarios they are useful. But before I finish off this post, I recommend that you import the Sample Application that comes with the plug-in. In the sample application, you will see many examples on how to best use the plug-in. Although probably not many people read documentation, we have it, and it's very extensive, so if you want to know the nitty-gritty details, it's a great resource.
And finally, if things are not going as planned and you need help, or you have questions or remarks, don't hesitate to contact the Plug-ins Pro support team at support@plug-ins-pro.com
This post was how to install the plug-in in your APEX app, in the next posts I will show you the different plug-ins. Here's a quick reference index which I will update on every blog post:
- Background on why we started Plug-ins Pro
- Sign-up and install your first Plug-ins Pro Plug-in
- You read it, it's this post 😀
- Client-Side Validation Pro
- Building a better Form in Oracle APEX: Instant validation and feedback on items
- Interactive Grid Checkbox Pro
- Add awesome checkboxes and status fields in an Interactive Grid in Oracle APEX
- Interactive Grid Download (& Preview File) Pro
- Adding a download (blob) link and context menu to your Interactive Grid in Oracle APEX
- File & Image Uploader Pro
- More Advanced File Uploads in Oracle APEX using an enhanced and supported Dropzone plug-in
- Interactive JET Charts Pro
- Power to the end-user! Create Interactive JET Charts in Oracle APEX
Coming up soon:
- An exciting new plug-in which we will announce :)
- More info on Plug-ins as a service, pricing, and the special offer


No comments:
Post a Comment