Saturday, September 28, 2019

Free Oracle Cloud: 9. Setup Object Storage and use for File Share and Backups

This post is part of a series of blog posts on the Best and Cheapest Oracle APEX hosting: Free Oracle Cloud.

In this post, we will look into how we can store and share files, with ourselves, with others, but also with our ATP Database, we set up earlier. The Oracle Cloud provides for this purpose Object Storage, and we get 20GB for free forever. This storage is also being used when you want to make backups of the database, and use Datapump to export and import data. In the previous blog post, when you followed the installation of the on-premises version of AOP, you actually connected to my Object Storage as the AOP zip file is on it.

Now we know the purpose of this Object Storage, let's get started to set it up.

Log in to the Oracle Cloud and navigate in the menu to Object Storage:


You arrive at the screen where you have to pick a compartment in the dropdown on the left. Compartments are used to organize your resources.


After selecting my compartment "dimi (root)", we get an overview of Buckets and we can create a new one by clicking on the Create Bucket button:


In the Create Bucket screen, you enter a name and the type of storage you want to add in that bucket.
First, we create an archive bucket, in which to store backups of our database:


In the next screen we create a standard bucket to share files with others:


We can now see we have two buckets: apexofficeprint (standad storage) and backups (archive storage). Note the 3 dots on the right of the bucket, which give you the ability to view details or perform some other actions:


As I wanted to share the AOP zip file in my object storage, in the menu I click the Edit Visibility link to make the bucket accessible for everybody (public).


Next, we will add a file to the bucket. Click the View Bucket Details:


We get the details of the Bucket and see an overview of the Objects in this Bucket:


Click the Upload Objects button:


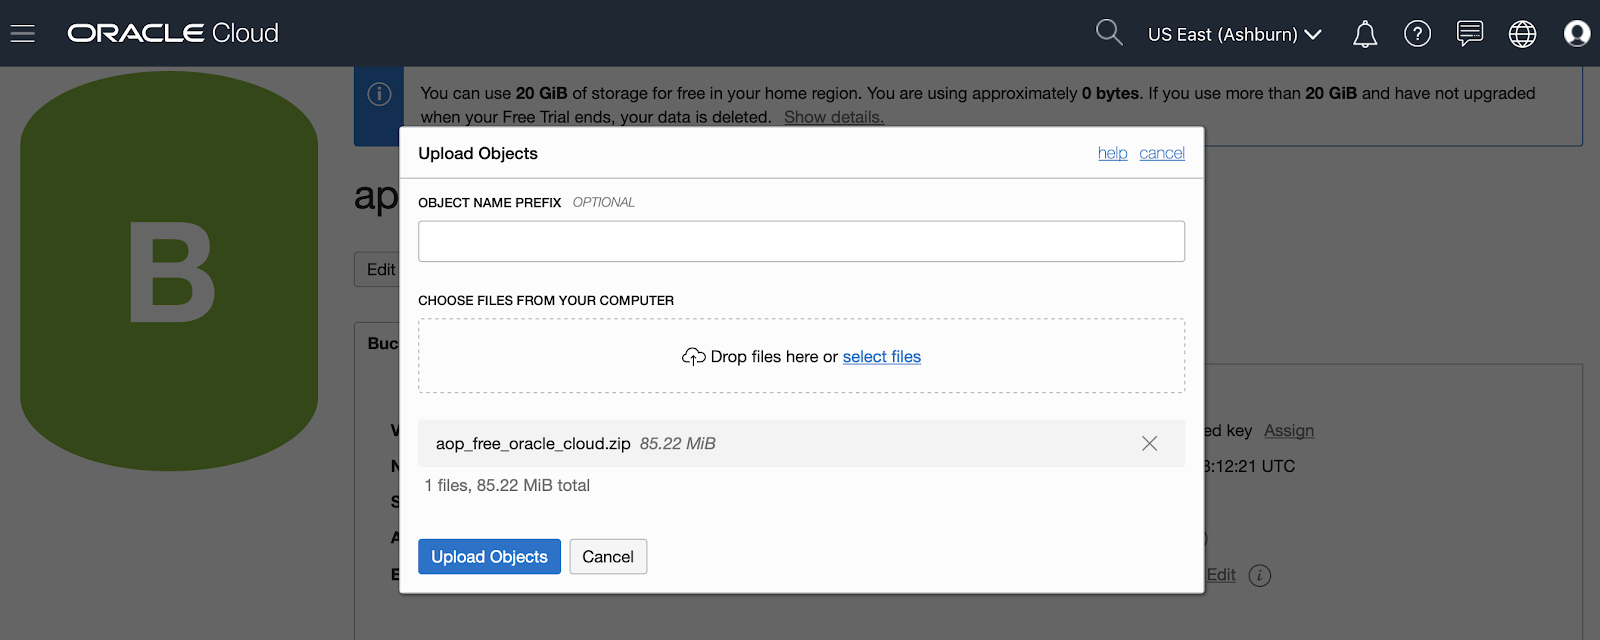
Drag a file in the Drop files area and hit the Upload Objects button:


We arrive back in the overview screen:


Just like in the Buckets overview, in the Objects Overview next to the objects you have the 3 dots on the right to perform actions on the object:


Click the View Object Details and you find next to some info, the URL where your object is accessible from:


So to conclude, an Object Storage exists out of Buckets which live in a certain Compartment and a Bucket exists out of Objects. (Object Storage => Compartments => Buckets => Objects)


Above we used the Oracle Cloud website to work with our Object Storage, but I'm also interested to do this from the command line. For example, we automated our build process when we make a new release of APEX Office Print. In the final step, we want to upload the new zip file to the cloud. When we can do everything from the command line, we can script and automate it.


You can follow the documentation on how to install the Command Line Interface (CLI).

I did the following on OSX (from Terminal) to install CLI:

bash -c "$(curl -L https://raw.githubusercontent.com/oracle/oci-cli/master/scripts/install/install.sh)"

The install script asked a few questions (where to install etc.) but I used all defaults and at the end, all was installed fine and I got the following screen:


At the end I moved everything from the bin directory in my default directory, so it's easier to call the CLI:

mv bin/* .

Next, configure CLI. We have to let the CLI know who we are. This is done by creating a config file and specifying the user CLI can connect as. Here we go:

./oci setup keys


Go to the Oracle Cloud website and set up a User based on the keys you created with CLI.

Go to Identity - Users in the menu and click the Create User button:


Enter a new user, as I wanted to create a user-specific for CLI I called it cliUser. Note that the email address you provide needs to be unique. I initially used the same email, but that didn't work.


Now we will need to add the key to this user. Click the View User Details button in the action menu of the user:


Click the Add Public Key button:


And copy the content of the ~/.oci/oci_api_key_public.pem file:


Next, we want to give this user Administrator privileges. To do so, go to Groups:


Click the Add User to Group button:


Select Administrators and hit the Add button:


Now, this user is all set to work with the Command Line Interface (CLI):


We will now configure the CLI to connect as the cliUser we just created.
In your terminal run in your home directory:

./oci setup config


The wizard asks for some OCIDs. Below I walk you through where to find them.

The user OCID, go to Identity > Users and the details of the user. Next to OCID click the Copy link:


The tenancy OCID you find in Administration > Tenancy Details:


The location you find when you scroll down in the Regions section of the Tenancy screen. Yours will be highlighted in green.


The final question of the wizard is if you want to create a new RSA key, answer No and point to the file (and not the directory like I first did). This is how it looks like after answering the questions:


Once the wizard is complete, you are all set. You can view the config file by doing:

cat .oci/config


Next, we want to create a Bucket in a Compartment and add a file through the CLI to that bucket.

Before we can run the command, we have to know the OCI of the Compartment. Here're the steps to get to that. Identity > Compartments:


 In the Details you find the OCI:


Now that we have everything we need, we can run the command to create a bucket called clibucket:

./oci os bucket create -c ocid1.tenancy.oc1..aaaaaaaakmf6mlauyaqmkkcikiuu2ckmklhffxf2weheu3qtfnsvcuzfuiuq --name clibucket


On success, we get a JSON back with the details of the bucket. If it errors, you will get an error back with details in JSON format.

Just to make sure the bucket is there, go to the Oracle Cloud website and check if you see the bucket we created with CLI:


To add an object to the bucket, you can do:

./oci os object put -bn clibucket --file test1.txt


Other commands I use more frequently:

# Get a list of the objects:
./oci os object list -bn clibucket

# Download a file called test1.txt and save it on your system as test2.txt
./oci os object get -bn clibucket --file test2.txt --name test1.txt

A useful resource to know which commands the CLI understands is in this documentation.
I did the above as an administrator, but if you want to read more about restricted use, you can read about that in Lawrence Gabriel's blog post.

I believe now you have a good understanding of the Object Storage and how to work with it through the website or through CLI. One of the reasons I mentioned was to use the Object Storage as a place for backups... let's look into that now.

When we go to our Autonomous Database, select your database and go into details. In the Resources section you find a link Backups:


Normally backups are automatically taken in ATP, but you can also create a manual backup:


When you create a manual backup, you have to specify the Object Storage bucket you want the backup to be saved in. But, when I tried to create a manual backup it told me that this option is not available in the Always Free Tier. Also, it says that restore is not possible, so not sure what happens when you want to restore an automated taken backup... for now, I'm not relying on those backups, in my next blog post I will tell you what I do for backups.


In the next blog post of this series, I will walk you how to use the Object Storage with the ATP Oracle Database to export and import data.

Wednesday, September 25, 2019

Free Oracle Cloud: 8. Setup APEX Office Print (AOP) to export to PDF, Excel, Word, Powerpoint, HTML and Text

This post is part of a series of blog posts on the Best and Cheapest Oracle APEX hosting: Free Oracle Cloud.

In the previous posts we setup our Always Free Oracle Cloud machine and an Autonomous Database with Oracle Application Express (APEX). In this post, I want to show you how to get started with the popular printing and reporting engine, APEX Office Print (AOP). The AOP software makes it super easy to export your data into a nice looking PDF, a custom Excel file, a fancy Powerpoint or other output formats of your choice, just the way you want it.

AOP is being used by many customers, even Oracle internally, to export their data in the format they want. The data can come from the database, a REST or GraphQL web service, or even components like the Interactive Report/Grid from Oracle APEX. Although AOP works with any technology, it is most known in the Oracle APEX community as it's the easiest and most integrated print engine for Oracle APEX. You create a template in DOCX, XLSX, PPTX, HTML or TEXT, specify the data source, and tell AOP in which format you want the output to be (PDF, Excel, Word, Powerpoint, HTML, Text) and AOP will do the rest! You can find more information in this presentation about AOP.

Christina Moore of Storm Petrel wrote me a few days ago following: "We have a client in one of our systems who generates a 1,888-page invoice monthly (about 2,000 pages). The most recent invoice was $1.3M USD and took 384MB. AOP handles it brilliantly. Well done. I can’t email it to you for confidentiality reasons, but know it has multiple sections that are merged with your tool too." I love feedback on the usage of AOP and am amazed how creative people are when developing with AOP!

I use AOP in every project because exporting/printing is a requirement sooner or later and an essential part of my Oracle APEX apps. So I thought to write how to use this in the Oracle Cloud :)

We have two options: we let our Oracle Autonomous Database and APEX talk to the AOP Cloud or we install an on-premises version of AOP on our own Compute VM. 

Ok, so let's get started...  open a browser and go to https://www.apexofficeprint.com and click the SIGN UP button:


Enter your email and hit Signup:


You will receive an email. Push the Confirm your email address button:


The browser will open where you can set a password for your account:


After hitting the Set Password button, you are logged in automatically and will see a Getting Started wizard:


Follow the wizard and you are all set! It should take less than 15 minutes :)

In short this is what the wizard will tell you:

  1. Download the AOP software and unzip the file
  2. Go to APEX > SQL Workshop > SQL Scripts > Upload and Run the file aop_db_pkg.sql which you find in the db folder. This will install the AOP PL/SQL API.
  3. Go to APEX > Your APP > Shared Components > Plug-ins and Import the APEX Plug-ins you find in the apex folder.
  4. Go to APEX > Your APP > Shared Components > Component Settings > APEX Office Print (AOP) and enter your API Key which you find in the Dashboard on the AOP site: 


The Component Settings in your APEX app:


The above is to configure APEX Office Print (AOP) in your own app using the AOP Cloud.

When you look closely at the previous screenshot of the Component Settings, look at the AOP URL.
The URL specifies where the AOP Server is running, which the AOP APEX Plug-in and AOP PL/SQL API communicate with. By default this is set to the AOP Cloud, so you don't have to set up an AOP Server in your own environment.

On-premises version of AOP

Although the AOP Cloud is really convenient as it's maintained and support by the APEX Office Print team, some customers prefer to run the AOP Server on their own machine, especially when data can't leave the datacenter.

So if you read on, I will walk you through Setting up the AOP Server on your own Compute VM in the Oracle Cloud.  Just be sure you have already installed the AOP Sample Application, plug-ins, and Database Objects, if needed, as instructed in the Getting Started section, above.

From a Terminal connect to your Oracle Cloud VM:

ssh -i ssh_key opc@public_ip

The first thing we do is change to the root user, as we want to install some supporting objects for AOP it will be easier to do it with the root user. Alternatively, in front of every command, you can add sudo.

We logged in as the OPC user, to become the ROOT user we do:

sudo su

Unlike other reporting engines, AOP software exists only out of a couple of files and is installed in no time. We will download the software in the tmp folder on our machine and unpack it in /opt/aop:

cd /tmp

wget https://objectstorage.us-ashburn-1.oraclecloud.com/n/id9u4qbhnjxj/b/apexofficeprint/o/aop_free_oracle_cloud.zip

unzip aop_free_oracle_cloud.zip -d /opt/aop

That's it!! The AOP Server is installed!


To support PDF output, AOP relies on a 3rd party converter like MS Office or LibreOffice. Here are the steps to install LibreOffice:

yum install java-1.8.0-openjdk.x86_64

yum install cups.x86_64

wget http://ftp.rz.tu-bs.de/pub/mirror/tdf/tdf-pub/libreoffice/stable/6.2.7/rpm/x86_64/LibreOffice_6.2.7_Linux_x86-64_rpm.tar.gz

tar -xvf LibreOffice_6.2.7_Linux_x86-64_rpm.tar.gz

cd /tmp/LibreOffice_6.2.7.1_Linux_x86-64_rpm/RPMS/

yum localinstall *.rpm

ln -s /opt/libreoffice6.2/program/soffice /usr/sbin/soffice

Note: if one of the above commands fail because yum is locked, you can remove the lock with: yum versionlock clear

LibreOffice is installed. To see if everything is fine you can run "soffice --version" and you should see something like this:


AOP comes with a built-in web server. When you start AOP you can define the port where AOP will listen to incoming requests. The default port is 8010. We will need to tell Linux this port can handle HTTP and HTTPS requests.

semanage port -a -t http_port_t  -p tcp 8010

To start AOP on the default port do:

cd /
./opt/aop/v19.2.3/server/APEXOfficePrintLinux64 --enable_printlog &

You should see something like this:


Yay!! AOP is running.

AOP comes with a cool Web Editor, we will make this Editor available on our domain dgielis.com/aop/. In order to do that, we will adapt Nginx to also be a reverse proxy for the AOP Web Editor. 
Here we go; 

vi  /etc/nginx/conf.d/dgielis.com.conf

And add the following section:

  location /aop/ {
    proxy_pass http://127.0.0.1:8010/;
  }

The server part of the config file becomes:


We need to reload Nginx:

nginx -s reload

And now when we go in a browser to dgielis.com/aop/ we see the AOP Web Editor:


You can now, for example, load a sample by clicking the "Load sample" button and select PDF.
Scroll down a bit lower and click the Process button and a PDF is being generated :)


The Web Editor is built in React.js and you can drag-drop your template and add some data to test the features of AOP. There's also a Logging tab (toggle between Editor and Logging), so you can see incoming requests, results and debug output in case of errors.


Now if we want to tell our Oracle APEX apps to use our own AOP Server, the only thing we have to do is change the AOP URL.

In your Oracle APEX app, go to Shared Components > Component Settings > APEX Office Print (AOP) and change the AOP URL to the URL of your own Compute VM:


That's it! You are all set to print and export data within your own environment :)

I would recommend looking at the AOP Sample App which you installed in the last step if you followed the Getting Started wizard. It will show over 500 examples of how to use AOP and its features!

Now I hope you enough knowledge so that you can please your customers with nice looking PDF, Excels and other documents in the format they want.


In the next post, we will add an Object Storage to our Always Free Oracle Cloud Plan so we have a place to store files and backups.