Monday, September 28, 2020

More Advanced File Uploads in Oracle APEX

This post is part of the Getting Started with Plug-ins Pro APEX plug-ins series.

In many Oracle Application Express projects, there's a requirement that people can upload files. Typically the end-users want the ability to drag-and-drop images, PDFs, or other file types in their application. 

For example, if you use APEX Office Print, you might have added in your application the ability for end-users to upload their own templates which typically are docx, xlsx, pptx, html and text files. 

Those files are then stored in the database in a BLOB column or they might be stored on a file server or cloud storage.

In order to add this capability in your app, APEX provides a File Browse item.


There are a few settings for this item type; where do you want to store those files (in a BLOB column or in a TEMP table), if you want to allow multiple file uploads at once, and which types of file you want to accept.

But be careful with the accepted File Types feature. You can define image/* if you want your browser to only allow selecting of images. BUT specifying the file type doesn't prevent users from dragging-and-dropping other file types! So you can't rely on this feature to keep other file types out of your database. 

As this is a native HTML File Browse item, you can customize it with CSS (and HTML and JavaScript). For example, you can make it look like what APEX provides in the APEX Builder itself:

In most of the projects I'm involved in, the end-users want more than the standard HTML File Browse that Oracle APEX provides out-of-the-box

The most requested features are:

  • Show which files were selected when adding multiple files
  • A visual indicator of the progress of uploading
  • Save files directly to the cloud (Oracle Cloud Object Storage, Amazon S3) instead of the database
  • Limit the file types that will be accepted
  • Only allow files with a size less than x MB
  • Specific to upload of images: resize and compress images and add watermarks automatically
  • Rename files
There are some excellent open-source JavaScript libraries that bring these features, one of the most known is Dropzone.js. Five years ago, Daniel Hochleitner even created an APEX Plug-in on top of it (with the last update 2 years ago). As this plug-in was really well written, we decided to use it as the starting point for our File & Image Uploader plug-in. You can see our plug-in as a supported version of Dropzone for Oracle APEX, with some extra features.


To use this plug-in, you first have to download and install it. I've covered that in my blog posts Plug-ins Pro: Getting started: Sign-up and install your first Oracle APEX Plug-in. So if you didn't import the File & Image Uploader Pro plug-in yet, read that post first.

I'll cover two use cases where we used our File & Image Uploader plug-in.

The first use case is for our RentMaster Platform software which assists in the renting of student homes. We have a form with the information of the contract, and a region which allows people to upload multiple files (up to 3, with a max file size of 5MB) that are linked to this contract. This information is stored in the CONTRACTS table and another CONTRACT_FILES table which has an FK to the CONTRACTS table. Here's a simplified version of the use case in action:


In order to create the above, we add a region with our plug-in on the left and a normal classic report on the right. We also have a Dynamic Action that fires when the files are uploaded so that the report on the right is refreshed.

The attributes of our plug-in region look like this. As storage type we use Custom Table:


The only thing we have to do is define the table in which we want to store the files and the relation (FK) with the parent (ID).

The plug-in exposes many dynamic action events, so you know exactly in which state the upload is in. We specified when Dropzone File Upload was successful:


Pretty simple and low code :)

In the second use case, our customer does auctions. With every auction, multiple images are included of the goods that are for sale. As there are so many images, all those images are resized and watermarked and put outside the database, on a file server and cloud storage. In this example, I will show how to do the image manipulation and save the files directly in the Object Storage of the Oracle Cloud.

Note: if you are interested in how to set up the Object Storage in the Oracle Cloud, read my series on the Always FREE Oracle Cloud.

In the next animated gif, you see again a simplified version in action. On the left the APEX application with the File & Image Uploader plug-in, on the right, the Oracle Cloud - Object Storage:


The attributes of our plug-in region look like this. As storage type we use this time Web Service:


Furthermore, in the attributes, we defined that we should only accept images with max size 3MB and only 10 files.

This time we also defined transformation parameters, a watermark and we rename the files on the fly.

In the United Codes File & Image Uploader Pro Sample Application, you will find an Attribute Builder, which makes it very easy to define what your transformations and watermark need to be, so you can just copy and paste in the attributes:


So we defined a Web Service... this web service can be anything. In my example, I created a web service in ORDS. In this web service, I make a call to the Object Storage REST API of the Oracle Cloud. The plug-in will pass some parameters to the web service: file, filename, mimetype, sessionid and appid:


When you look at the above, you might think... hmm, Dimitri is not doing any authentication to his Object Storage... that is correct. To simplify my example I setup Pre-Authenticated Requests for my bucket in the Object Storage. This provides me with a secure URL people can use to put files in my bucket.


I believe that most people will do proper authentication, which means you first do an extra call to get the authentication token. You may want to read JMJ Cloud's blog post if you want an example of how to do that from APEX. Adrian Png also did another blog post on how to deal with Object Storage from APEX.

Now back to the example... this is what the result looks like; the large image was scaled down, the quality was set to 80%, a watermark was added and the file was renamed - all on the fly and automatically!


So to recap this example: you add our region plug-in, you specify the actions you want to happen (transform, watermark, rename), define a web service which does the call to your cloud of choice and that's it, now whenever somebody uploads files in your Oracle APEX app, it will go straight to the cloud and all manipulations are done in the background!

There are many more use cases you can come up with. This plug-in is also part of our APEX Media Extension (AME). Using the Plug-ins Pro File & Image Uploader plug-in is great when you want things to happen on the client-side. When you already have images in your database, and you want to manipulate those images, you definitely want to check out AME, as it provides a PL/SQL API to do all that, and more (e.g. read meta-data of photos!). We built AME as a replacement for Oracle Intermedia (see blog post and here), we are even featured in the official Oracle documentation as a replacement.

Ok back, to this plug-in... just like any other Plug-ins Pro plug-in, there's extensive documentation and a great sample app that showcases the different features.

You can try the plug-in yourself for 1 month for free in your own APEX applications, so you can see what it can do for you. I also want to highlight that through the end of September 2020, there's a special running. You can find all the details on the Plug-ins Pro website!

Monday, September 21, 2020

Power to the end-user! Create Interactive JET Charts in Oracle APEX

This post is part of the Getting Started with Plug-ins Pro APEX plug-ins series.

Charts and visualizations become very important when talking about data. Businesses are using these visualizations to make an appealing story. You will find many tips and tricks on the internet when you search for Data Storytelling. One of the most important tips is to use the right chart for your data. 

So as a developer, will you figure out what type of chart to include in your Oracle APEX app? 
Or do you include a complete dashboard with every possible way to look at the data?

The issue is that the perfect chart depends on the story the business wants to tell!

Let's look at an example of that is pertinent to today: COVID data.

The table below shows the number of positive cases in the last 4 months for two different countries and a total.


Most likely, people would like to look at this data where the months go from left to right, so let's pivot the data:


How do we visualize this data?

If I add a Chart region in APEX, providing the data source, adding sorting and a Legend, it looks like this: 
 

We can now customize the chart further, but without knowing what the business wants to talk about, it's hard, no? We can use different colors, move the legend to the bottom, change the bars to be stacked, use a different chart type, etc..

When you look at the history of Oracle APEX, one of the most significant and breathtaking features has been Interactive Reports. As a developer, we specify just the SQL query, but the business user is able to look at the data in different ways.

With United Codes, we wanted to provide the developer and business user the same functionality as the Interactive Report but with charts. So I'm happy to introduce you to one of the most astonishing Plug-ins Pro APEX plug-ins: Interactive JET Charts Pro

Let's look at what this plug-in can bring to your end-users:


Did you see your end-users can save the customized charts, just like with Interactive Reports? They can add as many charts as they want, so they can quickly change to different views and even share those charts with colleagues!  


Mindblowing? Well, it was for me when I saw how far we got with this 😀

Before I show you how to add a customize button to your own charts, I want to continue the data story...

All of the charts I created in the animated gif are on the same data, but they all support a different story.

The line chart shows whether lines are going up, going down, or holding steady. You can clearly see that country 2 numbers decline and country 1’s take an upswing.

The clustered column chart directly compares the two columns. This is perfect when I want to focus on the difference between both countries: the orange column vs the green column. I changed the colors of the charts as they better represent the country and the difference is shown more clearly.

The stacked column chart focuses on part-to-whole patterns, how the gold segment and the green segment add up to a total. If I wanted to tell the story about the combined numbers of the countries I would pick the stacked bar chart.

So which one to pick, it all depends on the message you want to get across. The Interactive JET Chart APEX Plug-in is ideal if you need to brainstorm on several possible charts, to finally find the perfect chart to support your message. And the cool thing is that as a developer you don't have to make decisions about which type will be most suitable, you give the power to the end-user!

Ok, now that we have a bit more background as to why we built this plug-in, let me walk you through step-by-step how to get started in your own app.

The first step is to download and install the plug-in. I covered that in my blog post Plug-ins Pro: Getting started: Sign-up and install your first Oracle APEX Plug-in. So if you didn't import the Interactive JET Chart Pro plug-in or one of the other awesome Plug-ins Pro plug-ins yet, read that post first.

One point of attention, in the last step, when you install the plug-in it will prompt the Component Settings and you have to define which Procedure you want to use to save the charts. This plug-in will save the end-user settings in a table. 


I would recommend installing the Sample App that comes with the plug-in. This will install everything you need.
The procedure is called UC_JET_CHART_API.SAVEREPORT. You can look at that package and can customize it to your needs. As you have full control over the procedures to save, fetch, and delete charts, you can hook up authorization schemes or any rules you like.

In your application, go to a page where you have a JET Chart. Add a Button, right-click on it and add a Dynamic Action that fires on Click of the button. As Action, you specify United Codes Interactive JET Charts [Plug-in] and you select in Affected Elements the JET Chart Region.


That's it!

In the animated gif, I only did a few customizations, but there are so many more things in this plug-in! In the next example I hide and show a series, so you can focus on a single data set and I change a series chart type and color.


Another important feature is that you can download the JET chart you customized to a PNG file.
This way it's super easy to include the chart in a presentation or document.


Finally, just like any other Plug-ins Pro plug-in, there's extensive documentation and a great sample app that showcases the different features. I would strongly encourage you to look at the Live Demo in the sample app. The plug-in exposes many events, something I didn't even touch on in this blog post!


You can try the plug-in yourself for 1 month for free in your own APEX applications, so you can see what it can do for you. I also want to highlight that through the end of September 2020, there's a special running. You can find all the details on the Plug-ins Pro website!

I'm a big fan of charts and visualizations and I believe your end-users will love this plug-in! 

In 2008 I did a chart presentation at Kscope and I joked that using charts in your Oracle APEX apps is the shortest way to get a raise (as every manager loves pretty pictures). Our goal is to make you even more successful by providing you extra tools, if this plug-in also gives you a raise, it makes us full of joy. We wish for your success (and raises) 😀

Wednesday, September 16, 2020

Adding a download (blob) link and context menu to your Interactive Grid in Oracle APEX

This post is part of the Getting Started with Plug-ins Pro APEX plug-ins.

In this blog post, I want to highlight another Interactive Grid plug-in we've built: the United Codes Interactive Grid Download File Plug-in.

When you buy any of the United Codes products, when you go to your Account on the website, you can click on View Invoices and have the ability to download them. Those invoices were created with APEX Office Print (AOP) and stored in a BLOB column of a table.

Behind the scenes, we use a Classic Report with a Download BLOB column.

You have the same feature with an Interactive Report, you can go to any column, and make it a Download BLOB column as in the screenshot below. You tell from which table you want the file to be downloaded and give some extra info like mime type etc.

Jackie redid our entire backend system and used many more Interactive Grids (IG). When she tried to include a Download BLOB link, to her surprise there was no such option in an IG. And that is how our IG Download File Plug-in came to live!

Jackie, Bartosz, and I did some brainstorming on what such a plug-in would look like and it became a bit more than just a Download Link 😉

Although this plug-in is probably one of the smaller plug-ins of Plug-ins Pro, we love it and use it a lot in our own applications. Let me first show it in action!


As you can see, it's not just a bleeding fast download link, but you can customize what happens when you click. You can show a context menu on right-click or on a normal click and have full control over it. You can preview files and so much more!

Let's move on integrating this awesome download link into our Interactive Grid

The first step is to download and install the plug-in. I covered that in my blog posts Plug-ins Pro: Getting started: Sign-up and install your first Oracle APEX Plug-in. So if you didn't import the IG Download File Pro plug-in yet, read that post first.

Once it's installed it's pretty simple to use the plug-in. Go to your Interactive Grid and right-click on the Columns and add a new column called "DOWNLOAD" from type Link. Give it a CSS Class of "download", specify the target of the link as "javascript:///" and finally give it a link text. You could just give it plain text "Download" or you could specify for example an icon by using:
<i class="fa fa-download"></i>

The above step created a Download link column in our Interactive Grid. Now we will hook up the UC IG Download File Dynamic Action Plug-in to this column. Create a Dynamic Action, Event: Click, Selection: jQuery Selector with .download. As Action, we specify the United Codes IG Download File [Plug-In] and enter the requested details of the BLOB. That's it!

Here a quick screen-recording of me doing all those steps in a few seconds:


You also find the all steps completely documented in the Usage Guide > Implementation Guide.

Now, let's look a bit closer to the settings you can enter:


You specify the (ID) column in the Interactive Grid and the details of the table where the BLOB is found, like the name of the BLOB column, the mime type, and file name columns.

There are also some cool settings. You can keep a normal Download link, or you can extend it so the default behavior is not a download but a menu showing different options. In our own back-end, for example, we quickly wanted to see the preview of a PDF invoice. You just check the checkbox that you want the Context Menu and that is it. This Context Menu by default is enabled on right-click and has some predefined settings like Preview and Download, but you can customize it however you want and even make it the default action.

Events

This plug-in wouldn't be a Pro plug-in if it wouldn't expose events. Events allow you to interfere with the download process at any time. Here are the events you can use in your When of the Dynamic Action:


A typical use case of an event is showing a spinner while the download is transferring data. You find an example in the sample app that comes with the plug-in. Here's what it looks like:


And more ...

As we want our plug-ins to be used over the entire world, the plug-in supports translations and exposes many more customizations. Here's an example of a custom entry opening a modal window and showing more info of the file.


And of course, just like any other Plug-ins Pro plug-in, there's extensive documentation and a great sample app that showcases the different features.

You can try the plug-in yourself for 1 month for free in your own APEX applications, so you can see what it can do for you. I also want to highlight that through the end of September 2020, there's a special running. You can find all the details on the Plug-ins Pro website!

Monday, September 14, 2020

Add awesome checkboxes and status fields in an Interactive Grid in Oracle APEX

This post is part of the Getting Started with Plug-ins Pro APEX plug-ins.

I don't know about you, but I had a love/hate relationship with Interactive Grids in Oracle APEX.

I love it because it's really powerful and very useful and fast to insert, update, and delete multiple records at once. It was also the basis of many new things in APEX linked to modern web development.

But I also disliked it a bit, because to me it felt different than any other component in APEX. Especially in the beginning IGs just didn't work for me. Whenever I wanted to do something, I found myself writing multiple lines of JavaScript. Things have changed, IG is much more stable, and more built-in features have been introduced, and extending it has become easier, or I now have a better understanding of how things work. Today, in every project I do, Interactive Grids are part of it...

Interactive Grids follow the Model View Controller (MVC) model, which is typically used in JavaScript projects. Here's a diagram which shows the (complex) architecture of this component:


John Snyders, one of the architects behind IG, wrote a nice blog post in 2016 which explains Interactive Grids. When you look at John's blog, you will find many more posts about Interactive Grids. He also has an excellent IG cookbook app that shows different use cases of Interactive Grids.

In this blog post, I want to focus on how to represent a status field, I typically call it a flag field. The most common values of such a field are 'Yes' and 'No', 'On' and 'Off', 'Active' and 'Inactive', 'True' and 'False'.

Your native choices in Oracle APEX at the moment of writing are:
  • a checkbox
  • a radio group
  • a switch (which depending the component settings can look like a Switch, Pill Button or Select List)
And here's an animated gif showing how these options look. Changing the first row values from Yes to No and the second row from No from Yes.


The native implementation in APEX is that you have to click in the cell to make it editable, then you see the checkbox, and once selected it shows the display value. When I show those options to my customers, many of them tell me: "Can I not just have a checkbox?" They mean they always want to see the checkbox visible and selected or unselected, like you have with the Row Selector (first column in the IG). 

Although Interactive Grids have evolved over the last 4 years, in case you want such a checkbox, it's not as easy as it should be and you need to write custom JavaScript. When the question was asked on Twitter why it wasn't there yet, you see John's reply:


I told Bartosz, who is our lead developer at Plug-ins Pro, that I would love to have an Interactive Grid Checkbox Pro plug-in, to make it very easy to add a "simple checkbox"... but it turned out John was absolutely right... this is not an easy plug-in to do! After multiple iterations, Bartosz finally cracked it and he came back with a checkbox on steroids! 😉

When I think about a checkbox, I don't think about two values, but three:
  • null (untouched)
  • unchecked (not selected)
  • checked (selected)
So, we wanted to give people the choice of what they like: a checkbox with two values or three.
When we discussed the look of a checkbox it turns out that people like the HTML5 checkbox, which personally looks more 'old school' to me, but of course it's very known. But we wanted to give people more choice, so they have full freedom on the look-and-feel of the different states. In some applications it's more intuitive to have a switch look or a check icon or a smiley to name a few.

Here's a quick example of our plug-in in action 😀


Let's move on integrating this awesome checkbox into our Interactive Grid

The first step is to download and install the plug-in. I covered that in my blog posts Plug-ins Pro: Getting started: Sign-up and install your first Oracle APEX Plug-in. So if you didn't import the Checkbox Pro plug-in yet, read that post first.

Once it's installed it's pretty simple to use the plug-in. Go to a column of the Interactive Grid and change the Type of the column to the United Codes IG Checkbox [Plug-in].


You can customize the look and feel of the plug-in in the Settings area. The Type can be the HTML5 implementation or a checked and not checked icon. So if you want thumbs-up and thumbs-down, or you want a square and checkbox, you name it, you are free to define the icon of your choice.
Next, you define the value it should have when checked and not checked and whether you want to see an empty column or the not checked value when you add a new row.
Finally, you can define if you want to see a title on hover and if people should be able to click the checkbox in the read mode of the IG or only when Edit mode is on (which is default IG behaviour). 
The last bit is really what makes this checkbox such a nice user experience. People don't have to be in the cell first to change the checkbox or icon! You don't hear or see my body language when I tell you that sentence, but I'm super excited (!) about this feature!  The edit and read mode of the IG, made this plug-in so hard to make.

Events

What is really cool about this plug-in, it's not just a visual checkbox, but it also behaves like a native item and column in APEX. So if you want to dynamically set the value of the checkbox, the plug-in understands that. In the below example, when we change the First name to DIMI, it will set the value of the IS_ACTIVE4 checkbox column.


Also when you want to detect a change of the state of the checkbox, you can hook up a dynamic action to that. In the below example, we have a change event on the checkbox on column IS_ACTIVE1 and IS_ACTIVE4. Whenever we change that column (meaning when we check/uncheck the checkbox) the salary will change.


And this is what it looks like:


And there is more...

The checkbox is accessible, supports validations, and you can style it however you want.

And just like any other Plug-ins Pro plug-in, there's extensive documentation and a great sample app that showcases the different features.

You can try the plug-in yourself for 1 month for free in your own APEX applications, so you can see what it can do for you. I also want to highlight that through the end of September 2020, there's a special running. You can find all the details on the Plug-ins Pro website!

I use this plug-in in every Oracle APEX project and I strongly believe anybody using Interactive Grids will benefit from this plug-in! This plug-in works from Oracle APEX 19.2 and above.

Note: depending on when you read this article, the plans are that from Oracle APEX 20.2 a more advanced checkbox item is native available, but it's unclear if it has all of the features our checkbox plug-in has. I will update this post once APEX 20.2 comes out. 

Monday, September 07, 2020

Building a better Form in Oracle APEX: Instant validation and feedback on items

This post is part of the Getting Started with Plug-ins Pro APEX plug-ins.

Creating a form with some items in Oracle APEX is fast and easy... Here's an example of a sign-up form I created in my APEX app, heavily inspired on the Github sign-up form. 

I added a region, a couple of items, and a button to a page. Here's how it looks behind the scenes:

In order for us to get good data we will need to specify some validations, so end-users can't type just anything. If we don't then, for example, when entering a username that already exists they'll get a unique key violation error.

Here are the validations we will specify:

  • username doesn't exist yet
  • valid email
  • password must comply with our complexity rules
  • username, email, and password are required
  • when registering as a company the company name must be entered
  • only allow valid VAT number when entered
And this is how these validations look on our APEX page. You will see we use different types of validations: PL/SQL, no rows returned, regular expressions, etc.:


When we do nothing else on our APEX page and leave the form as is, it will cause frustrations for many end-users, because:

  • When a typo is made in the email field, they will only be notified after they hit the sign up button
  • When the password doesn't comply, again, only after hitting the button they are notified
  • When the username is already taken, only after hitting the sign up button they find out about it

As a developer, I strive to make my forms as user-friendly as possible in the time I have. We are responsible for the apps we put out there and we love our customers, so the last thing we want is to cause any type of frustration.

So if we want to improve our Oracle APEX page, what does it take? 

We want to have our validations be user friendly, context-aware, and responsive, meaning the end-user should see the issues live, relevant for what they are doing at that moment.

And here's the problem for the developer... it takes a lot of effort and different skillsets: native APEX skills, PL/SQL skills, JavaScript. This is what we already have:

  • There's a PL/SQL process, which handles the sign-up and spits back errors in case things go wrong
  • We already created APEX validations that are run before the sign-up process
  • We already have some items where the value required field set to Yes 
  • For the email item, we also specified the correct type of item
All those validations are being fired when you hit the Sign Up button. In the case of a value being required and email type specified on an email item, the check is done before the page is submitted, but for all the validations we specified in the processing section, those only get fired when the page is submitted. 

When we want to give the end-user immediate feedback while they are entering something in an item that is not correct, this requires manual coding. You end-up writing many dynamic actions and potentially some custom JavaScript and AJAX calls.

Some developers might think to only include the dynamic action validations, but that is even worse. You have to have the APEX (server-side) validations, as you can't rely on JavaScript being fired. So you end up duplicating the logic in the validation portion of the processing section and your own dynamic action code. Whenever something changes, you have to change twice... 

It's an understatement when I say I don't like to write code to tackle the same thing twice!

So instead of all this manual development, what is the solution? Use the Plug-ins Pro Client-side Validation Plug-in! I will show you exactly how to do that now 😃

The first step is to download and install the plug-in. I covered that in my blog posts Plug-ins Pro: Getting started: Sign-up and install your first Oracle APEX Plug-in. So if you didn't import the Client-side Validation plug-in yet, read that post first.

Next, create a Dynamic Action on the page which will fire on change or on key release for the items we want to check. Now, you can specify all items, or even cooler (!) you can specify the region, and all items in that region will be validated! So whenever the user enters something in the fields of that region, the dynamic action will fire.


And as Action, we specify the Client-side Validation Pro [Plug-In] and for Affected Elements, we leave it blank. The plug-in is super smart and will show the notification for the item you are on, but if you specify the items that are affected, it will validate all of those items.


That's it!! When you run the page, the end-user gets instant feedback!


The above implementation of the plug-in barely scratches the surface. I always specified in the validation to show the notification inline with the item, but the plug-in also supports showing a notification on top of the page or both. This plug-in is a real powerhouse! 

It even 
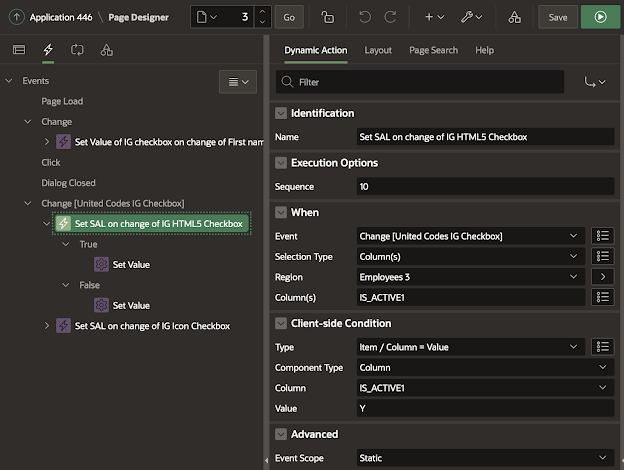
supports validations for Interactive Grids! If you are interested in live IG validations, check out the Sample App (under Triggering Elements) that ships with the plug-in. Normally it would require a lot of (hardcoded) JavaScript, but not when using the plug-in. One client-side validation and native APEX validations do the job! Here's a quick screen recording with an example:


I can't stop telling how amazing this plug-in is! It's *really* smart. APEX has many validations built-in (HTML5 and Server-side validations) but this plug-in will combine them all together with client-side validations in a seamless user experience. If the plug-in can do the validation without a round-trip to the database, it will. There's no duplication of code, it's super easy to implement and very maintainable and it will save you hours or even days of development. 

This blog post would become really long if I would go over all the features of the plug-in, but I do want to highlight one other implementation that takes so much manual code without this plug-in.

What if we wanted to give a soft warning? So when the validation fails, the user can still say to move on. Here's an example: I have a form where you can enter 3 numbers. Number 1 and Number 2 and the sum of both. On submit it will validate the result and do some processing.


So when I enter 1 + 2 = 3, the page should submit fine. But when I enter 1 + 2 = 4, I should get a question if I want to continue or not. If I say no, it should stay on the page. When I say yes, it should submit nevertheless. Here's a quick gif to explain what I mean:


So let's look at what we did behind the scenes to do this.

We have a region, with 3 items and a button. The button is defined by a dynamic action. The Dynamic Action is called Client-side Validation and it fires on click of the Submit button.
As a true action we specified the Client-side Validation Pro [Plug-in] with the following settings:


Note that we defined a success callback and failure callback and this is what makes our validation conditional! This is something that is not possible with Oracle APEX out-of-the-box. When the validation is successful we submit the page. But when it fails, we ask for confirmation if the end-user wants to continue even with an invalid result. If yes, we will give a hidden item on the page the value 'Y'.

Our Validation is a normal APEX validation defined in the processing section of our page:


Pretty powerful, right? 😉

I mentioned in a previous blog post we don't take things lightly. We spend a huge amount of time on the development to make the plug-in act as a real component, so it knows about universal theme and translations to name a few. We try to make it as easy as possible for you to use, along with writing detailed documentation and creating a sample application that shows the different features of the plug-in. This all together took over 400 hours to do for this plug-in, but every time I use the plug-in myself, I'm happy we did. I'm super excited that I can just use it without me needing to write all this code and maintain it and there is great documentation and a sample app to get me going fast.  

There's nothing that comes even close to what this plug-in can do. If you read the documentation of this plug-in and look at the sample app, you will understand 😉

You can try the plug-in yourself for 1 month for free in your own APEX applications, so you can see what it can do for you. I also want to highlight that through the end of September 2020, there's a special running. You can find all the details on the Plug-ins Pro website!

It may not be the sexiest plug-in, but heck, it works!