Friday, November 11, 2022

Oracle APEX: Use saved report name of Interactive Report in Export

Recently there was a question on Twitter about how to use the saved report name in an export of an Interactive Report in Oracle APEX
 

First, if you never heard of APEX Office Print (AOP), or in short, AOP, it's the leading document generation software for Oracle APEX. AOP allows you to create PDF, Word, Excel, PowerPoint, Text, and HTML documents with data from your database and your Oracle APEX app. AOP is unique as it's tightly integrated with Oracle APEX. You create a template in Word, Excel, PowerPoint, Text, or HTML, and tags that are included in your template will be replaced by data. In the tweet, Matic speaks about the {&interactive} tag. When you add this tag to your Word, Excel, or HTML document, AOP generates the Interactive Report in your document. AOP is even so smart that it will recognize if you have filters, highlights, groupings, etc., defined!

So I thought to create an example and see what it would take to get the Saved Report name in the document.

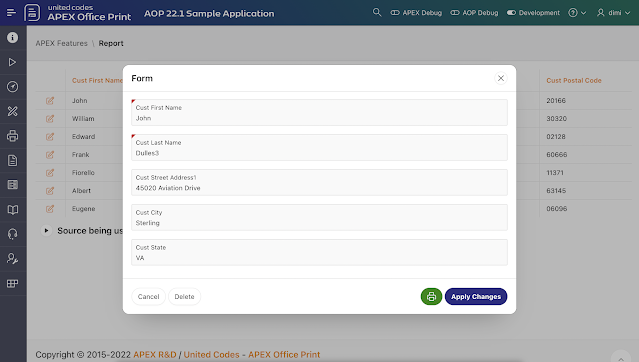
I went into the AOP Sample Application and clicked on the example where there are Saved Reports for an Interactive Report. The way I understand the question is how to use the name of the saved report, in our case, "3. Highlight", in the export to Excel or PDF.

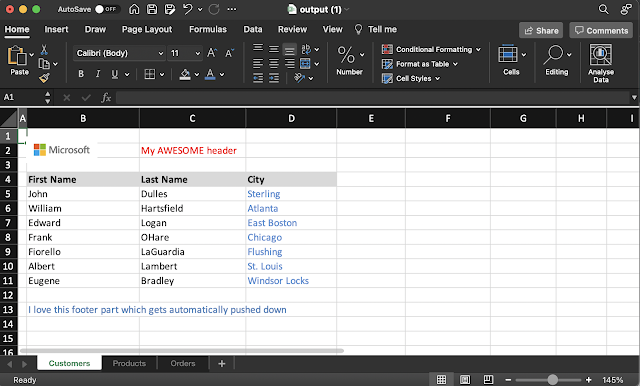
The result when you export or download to Excel should be like this:

Here are the steps to get it done.

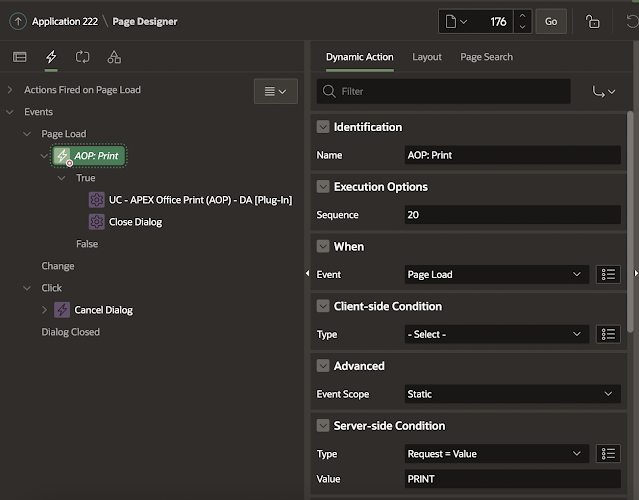
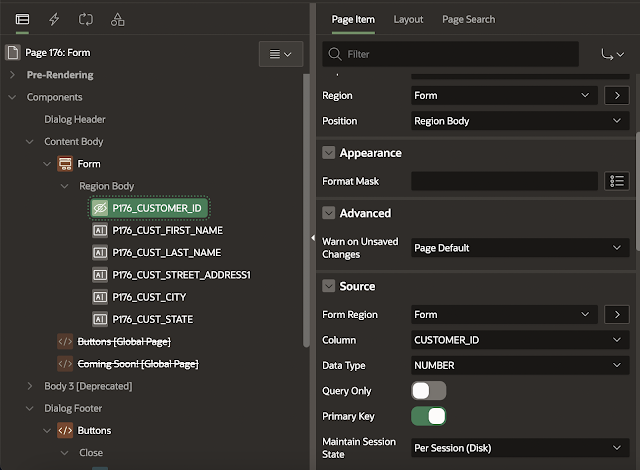
1. Create a hidden item on the page. We will use this item to store the name of the saved report.


2. Create a dynamic action on click of the Excel button and add a Set Value Action with the following JavaScript Expression:

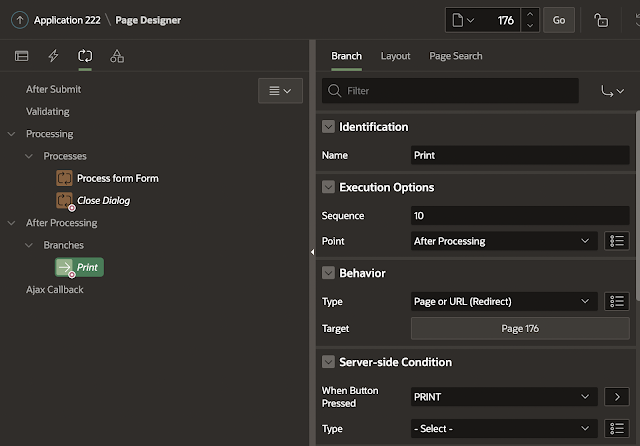
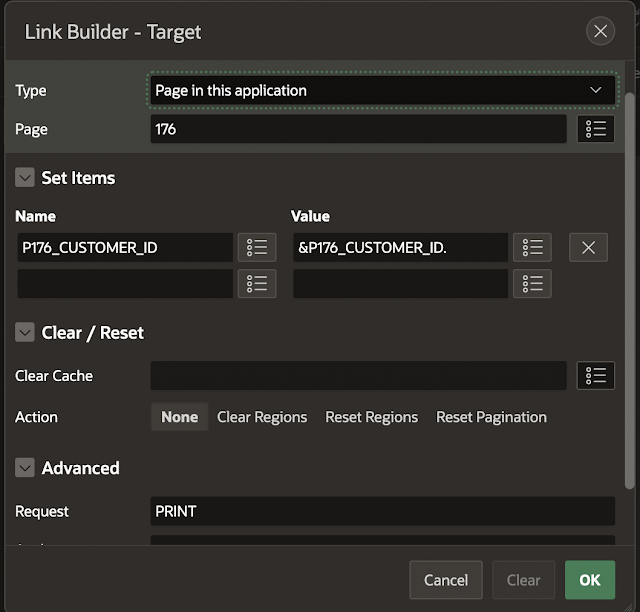
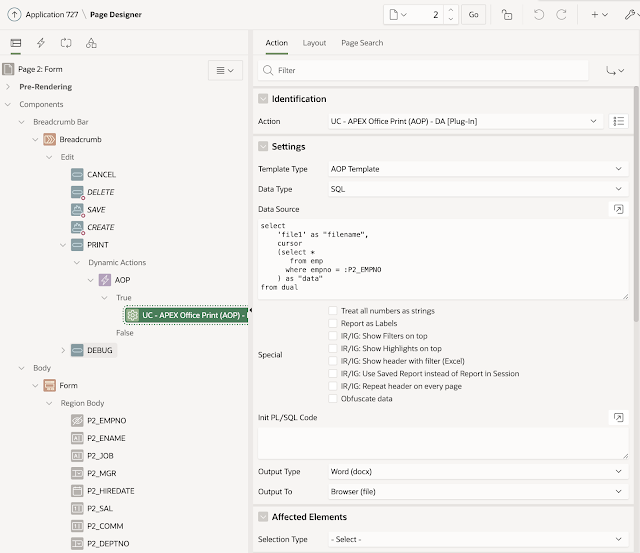
3. Add the APEX Office Print Dynamic Action plug-in as another Action. We tell AOP we stored our template in Static Application Files with the name "aop_IR_template_saved_report.xlsx".  Our data comes from the IR, so we define the static Id of the IR region "ireport1". As output, we took Excel, but you can also take another output like PDF, for example. It's important to add the hidden item in the "Affected Elements" section, as AOP will get the values of those items too.

4. And finally, this is what our template looks like.

The hidden item is in the ireport region. You can reference the item with the following tag:
{ireport_items[0].P5061_SAVED_REPORT_TITLE}. An alternative, in case you have multiple items you want to reference, you can use {#ireport_items} ... define all your items with {tag} ... {/ireport_items}

And to get the Interactive Report, you define in a cell of your choice the tag {&interactive}.
In case you submit multiple IRs, or a combination of Classic Reports, IGs, and IRs, it would be {&interactive_1} {&interactive_2} {&classic1&} {&ig1&} etc. 


And that is it! 

I'm always amazed by how far we have brought AOP in the last 7 years. We have never been more committed to providing solutions to all of the reporting, exporting, and document generation needs you have ... and there is more to come 😁


Thursday, November 10, 2022

World Cup 2022 Challenge online!

For the last 16 years, with every big football tournament (World Cup and Euro Cup), we've launched an Oracle APEX app where you can predict the scores of the games. You can find this year's app at https://wc2022.unitedcodes.com


Features

Many people do a challenge with their friends or company, for fun, for money... Instead of using a custom-made Excel, use of email, or use of paper, you can use the World Cup 2022 Challenge site to track who's in the lead.
  • You can enter the scores of every game and see how well your predictions compare to others (overall).
  • You can create a group e.g. your company, or a team, etc and see how well you play within your group.
  • You can see statistics of predictions
History

16 years ago, I built a site to promote the use of Oracle APEX. People loved it, so I decided to update the site with every new release of APEX. You can find some more history and screenshots of how the app looked here

Oracle APEX features

When upgrading to the new Oracle APEX version, the Advisor and Upgrade assistant were run. This year the site runs on Oracle APEX 22.1, Universal theme got refreshed, the site is more mobile friendly and some components like the calendar where updated. Social authentication was re-enabled, so you can sign-up and log in with Email, Facebook or Google.

Thanks to Kevin and Theo who did most of the work!

Go and play!

Head  to the site/app and start challenging your friends 😀

Tuesday, October 18, 2022

Oracle APEX Form: Save before Print

In almost every Oracle APEX application I create a Report with Form to edit the data.


On this Form many people add a Print button to generate a document for this specific record.


From time to time I get the question how to first save the record and next print or download the document.

Here are the 5 steps to do this:

1. Duplicate the Save button and name the button Print. Or alternatively create the Print button from scratch and make sure to set the action to Submit, the Database Action to SQL UPDATE action, and make it conditional to only show when the PK is not null. 

This will make sure when the automatic row processing is performed the update is happening.

2. In the processing section, create a Branch with a Server-side Condition when button pressed PRINT. 


When clicking the Target button in the Branch, link to the same page, and pass the item with the primary key and most importantly set the Request to PRINT.


3. Create a new Dynamic Action called AOP Print which runs on Page Load with a Server-side Condition that the Request value = PRINT (as we defined in the Branch).

4. Add as True Action the APEX Office Print (AOP) dynamic action (DA) plug-in. 
Specify the template and data (SQL) and the output you want (PDF). We want the document to download into the browser.


Optionally, add another True action to Close the Dialog in case your Form is a dialog and you want it to automatically close.

5. When you download the document, it might be empty. This is because our PK isn't known to the AOP process. See my previous blog post which goes in more details. So the final step is to set Maintain Session State: Per Session (Disk) for the primary key item.


And that's it... now when you click the Print button, it will save the record first and next download the document to the browser (and optionally close the dialog of the Form).

Tuesday, October 11, 2022

No value of a page item when using a Dynamic Action

Sometimes you expect to see some data in your Oracle APEX application and it's not there... in this post I will describe one use case I see more often and how to solve it.

We have a report which shows all the employees (coming from the EMP table):


Clicking the pencil icon opens up the form of that employee:


We added two extra buttons

  • a print icon which creates a document for the employee
  • a bug icon which adds 10% of the salary in the commission field

Let's first start to see what is behind our Print button. We use the APEX Office Print (AOP) Dynamic Action to generate a document, but when opening the document it's empty. 


Behind our Bug button we have a Dynamic Action that fires a process and sets the value of an item when P2_EMPNO is not empty, but for some reason the commission is not being filled in.

In both cases, we don't get the data that we expect to see...

Whenever you have an issue like this, I turn APEX debug on (see APEX developer toolbar and click Debug > App Trace), click the button again and check my debug output (Debug > View Debug).


This is what I saw in the debug output after clicking the Bug icon:

We can see that the EMPNO item is empty, so our IF statement in our code is returning false, and the commission is not being calculated.

By default, APEX puts the primary key column as a hidden item on the page. The following two settings of the item are important: Maintain Session State is set to "Per Request (Memory Only), and Session State Protection is set to "Checksum Required - Session Level".


The error in the debug output was "Access to undefined Per Request (Memory Only) variable P2_EMPNO", which doesn't allow the value of the item to be known in dynamic actions (AJAX requests). One way to solve this is to change the "Maintain Session State" to "Per Session (Disk)".  


And now, on the debug output, we see the value of P2_EMPNO being filled in, and the commission is being calculated.


Also, when we Print the document, we now see that the employee is being filled in.

Yay! We now see our data! 😀 

You might wonder why did this solve my issue? When session state is maintained "Per Session" the value is stored in the database and available across requests, whereas when "Per Request" is set, the value is only available during page load.

An alternative to the above solution is to define in your dynamic action the item you need the value of in "Items to Submit". But with session state protected items, depending on the use case, this might not always work, and you get a checksum error.

Monday, April 04, 2022

Export multiple tables to one Excel with different sheets in Oracle APEX

Today there was a question on how to export data from the Oracle Database and Oracle APEX into one Excel file with multiple sheets. Each sheet contains data from a different table.

With APEX Office Print it's a matter of a few minutes to fulfill this request 😀

If you have never heard of APEX Office Print (AOP), here's one paragraph on it.  AOP is the easiest to use product/plug-in that fully integrates with Oracle APEX to give you all the reporting and export functionality you've dreamed of. You create templates in Word, Excel, PowerPoint, HTML, or Text and AOP will merge it with the data coming from your database, APEX components, or REST Web Service and return a document to you in the output format of your choice (PDF, Word, Excel, PowerPoint, HTML, Text). If you want to get started with AOP, here's a quick Getting Started with AOP video.

Let's get back to this example where we want to generate a single Excel file, with multiple sheets and each sheet contains data from a different table.


Step 1: Prepare your SQL statement.

In this example, we want to export the data coming from our customers, products, and orders table.
AOP understands the CURSOR Expressions of SQL. Each cursor will contain the columns of the different tables. You can have as many cursors as you want, look at them as blocks of data.

select
  'file1' as "filename", 
  cursor(
    select  
      cursor(
        select
          cust_first_name,
          cust_last_name,
          cust_city
        from aop_sample_customers) as "customers"
    , cursor(
        select 
          order_id, 
          order_total          
        from aop_sample_orders) as "orders"
    , cursor(
        select 
          product_name, 
          product_description,
          category,
          product_avail,
          list_price
        from aop_sample_product_info) "product"
    from dual) as "data"
from dual

Note that with the cursor expression you can also create more nested data (as seen in the AOP Sample App on page 30). For example, if you want to see all orders and order lines of a specific customer, your SQL statement would look like this:

select
  'file1' as "filename", 
  cursor(
    select
      c.cust_first_name as "cust_first_name",
      c.cust_last_name as "cust_last_name",
      c.cust_city as "cust_city",
      cursor(select o.order_total as "order_total", 
                    'Order ' || rownum as "order_name",
                cursor(select p.product_name as "product_name", 
                              i.quantity as "quantity",
                              i.unit_price as "unit_price" 
                         from aop_sample_order_items i,
                              aop_sample_product_info p
                        where o.order_id = i.order_id
                          and i.product_id = p.product_id
                      ) "product"
               from aop_sample_orders o
              where c.customer_id = o.customer_id
            ) "orders"
    from aop_sample_customers c
    where customer_id = :CUSTOMER_ID
  ) as "data"
from dual

So you can add the CURSOR() expressions on the same level as well as in a hierarchy.

Now that we understand this, let's get back to our example, where we wanted to export the data from the SQL statement to different sheets in Excel.


Step 2: Create your Excel template

There are a few ways to create your own template:

  • You can start from a new empty Excel document,
  • or you can start from a template of your company (e.g. with the logo and some house branding),
  • or you can download a template you like from Microsoft's Excel template repository,
  • or you can let AOP generate a starter template for you.
We will use the last option. Nothing easier than letting AOP create a template for us!

AOP has a PL/SQL API or an Oracle APEX plug-in you can use. In this example, we will use the plug-in. I won't go over how to install the Oracle APEX plug-in, you can find that in the getting started video.

So, on our Oracle APEX page, we create a button and a dynamic action calling the APEX Office Print plug-in. We specify that we want an AOP Template, we add the SQL statement as the data source, and select an Excel file as the output type. Here's what it looks like in Oracle APEX:


When clicking the button, this is the Excel file AOP generated:


The AOP template will add the tags (see lines 4, 7, and 10 between {}) for the data you specified in the SQL file, and give some more explanations below to explain what is possible with AOP. For example, AOP can also generate sheets or use formulas dynamically.

To finish our template, the only thing we need to do is to copy lines 7 and 10 and put them on their own sheets. Finally, we customize the template exactly as we want. For example, we can give it a header, make some tags bold and make it really pretty with our company logo.


Once we are happy with our template, let's upload it to Static Application Files in our app. Note: you can store the template in your own table, the filesystem, online, anywhere that AOP can access.


Step 3: Specify the template and Done!

Finally, specify the new template in the AOP Dynamic Action. The Template Type is Static Application Files and the Template Source is the filename.

And presto, you are done! Click your Excel button again and here's the output:


So any time you need to create a report in Excel with data coming from Oracle APEX or the database, you know you can do it with APEX Office Print (AOP)! 😁